Lifespans of Cedar Roofs
August 4th, 2017
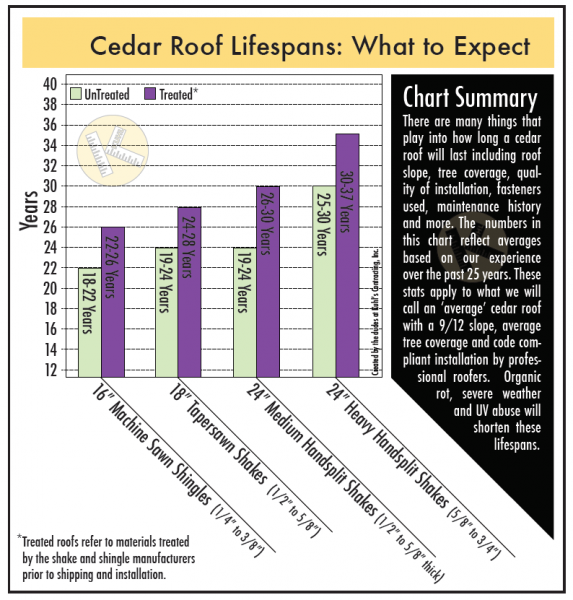
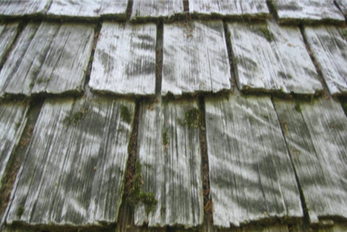
How long should cedar roofs last?
August 4th, 2017
July 21st, 2017
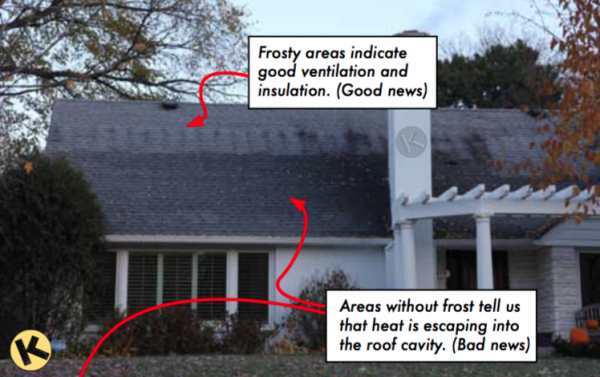
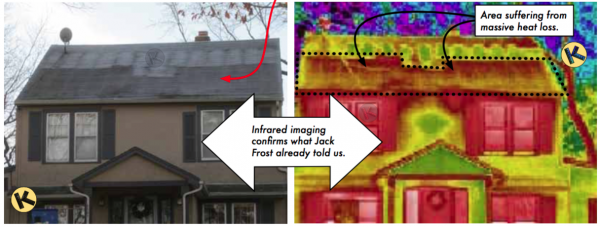
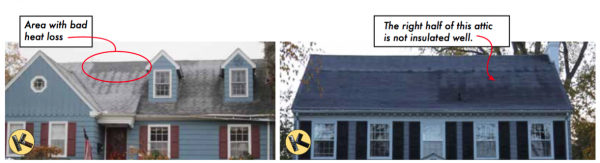
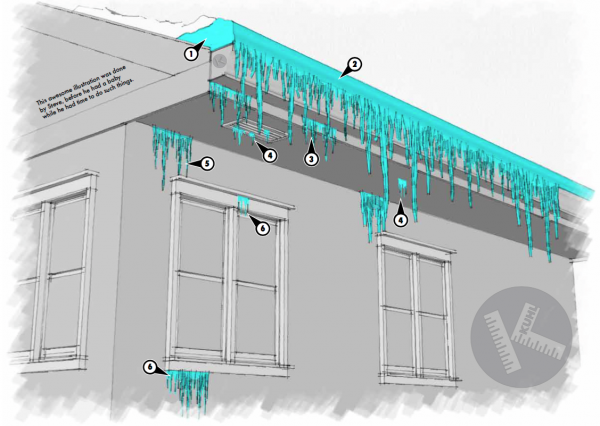
At their most fundamental level, ice dams are the result of the interaction of heat loss and snow on your roof. An experienced Kuhl Thermographer can use photos like these in conjunction with infrared imaging to see the weak points in your homes thermal envelope. If you have a moment on the next frosty morning, take a few photos of your roof from a few angles before the sun hits it. Those photos may end up saving you time and money if you are hoping to x the root cause of ice dams and home heating inefficiencies.
July 7th, 2017
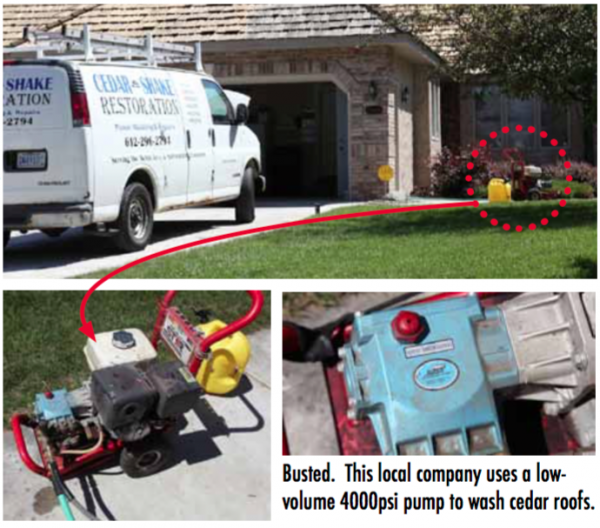
If your roof is in good enough condition to wash, congratulations. You have the opportunity to add years to its remaining life through occasional maintenance. But it is important to understand that a cedar roof should only be washed using specialized equipment. Standard pressure washers, like the one pictured to the right, will do a good deal of damage to a cedar roof regardless of the user. That damage will most likely not be visible from the ground because it is a matter of hundreds of an inch. In fact, consumer-grade pressure washers will remove between five and eight times the amount of wood from your cedar roof than professional equipment. If you have ever seen a cedar deck that looks furry and splintery after washing you know what we are talking about.
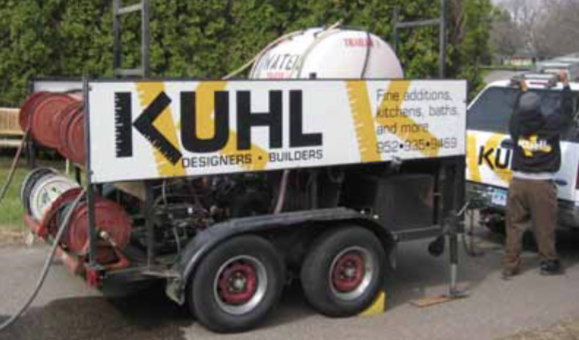
Kuhl only uses high volume, low-pressure equipment
to wash cedar roofs. Our trailer mounted washing
unit is custom built for washing cedar roofs and cost us $25,000, not including Steve’s free labor to weld it all together. There are only a couple of wood restoration firms in the country that use this specialty equipment. Where the standard consumer-grade machine will push 3-4 gallons per minute through the wand, ours pushes 12! This is why we often refer to our process as power rinsing, not power washing.
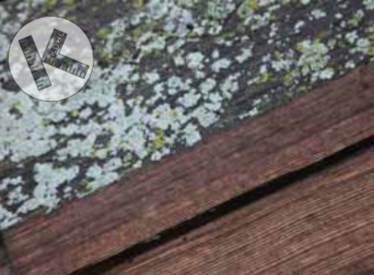
Because regular pressure washers–the kind used by painters, handymen and some of our competitors–are an entirely different machine. Such units should never be used on a cedar roof as they operate at inappropriate water volume to pressure ratios, resulting in significant wood loss. (See the photo in the header of this Case Study. Right half shows major wood loss.)
If something like this shows up in your driveway the day your roof is to be cleaned, you’ve hired a pro with the commitment to invest in the right tools for the job. If someone in a minivan shows up, you may want to reconsider.
Companies that don’t invest in industrial equipment do so for
one reason; it is much cheaper to use a cheap machine than an industrial unit. Furthermore from the ground the results look about the same to you. The discoloration on your roof is gone, the roof looks fresh and clean again. But upon close inspection you will see that those machines have removed a lot of wood. Not good. Regardless of the appearance from the ground, using a typical pressure washer on a cedar roof will take years off its existing lifespan even if wood cleaners and/or brighteners are used. Ultimately, wood loss in the keyways is one of the primary reasons your roof will fail in the future.
High volume machinery cleans cedar without damaging it.
June 30th, 2017
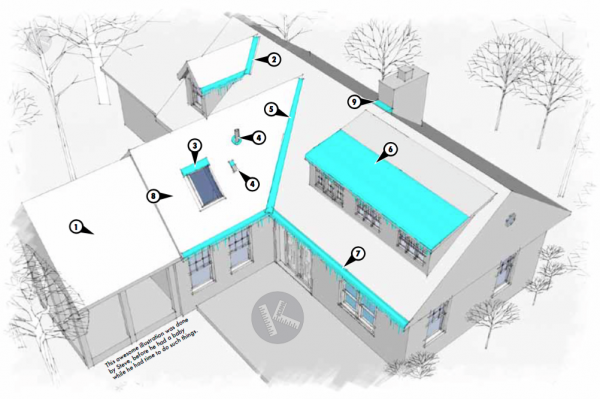
After being in business this long we have countless examples of crappy work done by other contractors here in the Twin Cities. Sometimes it’s a matter of inexperience while others it is a question of ethics. Either way, it’s a giant buzz kill to find out the guy you hired a while back pulled a fast one and left you with a bad job. But in defense of good contractors in Minneapolis–and there are many of them–homeowners frequently bear some responsibility in this story because they cared more about low price than other factors. Yes, this is a case study about getting what you pay for.
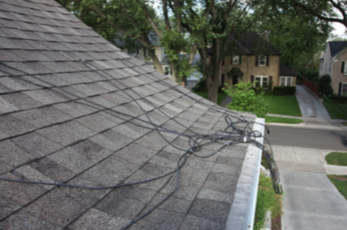
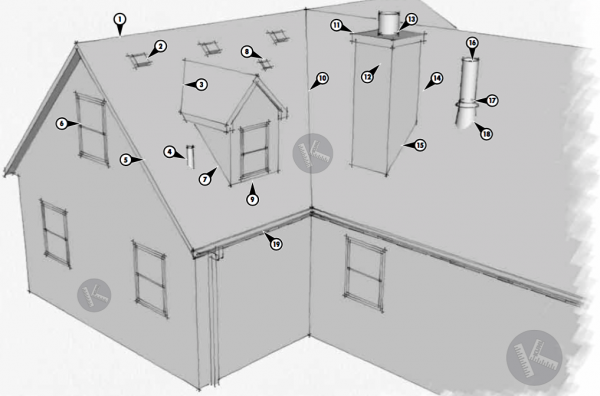
1. Heat cable job on Edina Country Club home. Cheap cable bought from Home Depot. Spaghetti install method used.
2. Cedar roof washing attempted on roof that should never have been washed. We ended up replacing this roof.
3. Kickout flashing installed on cedar roof in Minnetonka. It was not installed into the stucco and was therefore useless.
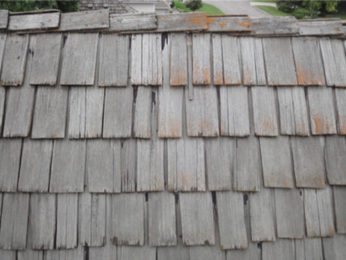
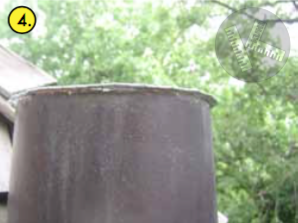
4. Cedar roof deemed worthy by our competitor of washing and restoration. Bad idea. We replaced this roof a year later.
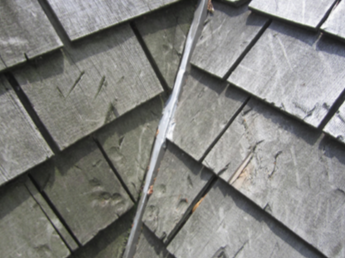
5. Roof damage caused by ice dam removal with a hammer and pick in Edina. The valley metal was punctured in many locations. Ouch.
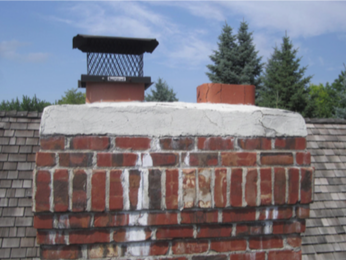
6. Chimney cap repaired via the application of magic goop. This ‘ten year x’ lasted two years. We replaced the chimney crown entirely.
You hear it all the time. You get what you pay for. Well, yes and no. We all know it’s possible to pay a lot for crappy work and on rare occasion pay a little for excellent work. Still, it’s generally true that the ‘get-what-you-pay-for’ principle applies to residential contracting here in the Minnesota. If you receive an estimate from our competition that is substantially lower, the odds are they are including lower quality labor or materials, they plan on change-ordering you to death, they have figured out ways to cut corners during the job, or a combination of all the above. It’s normally not the case that the other company has decided to profit less from their work. They run a business, after all.
In the case of Kuhl’s Contracting, what you buy always aligns with what you spend because we jointly agree on your needs up front. Want to perform your work on a tight budget? Not a problem. Concerned mostly about the long-term performance of the work? Not a problem. The work we do for you-and what it costs-will depend on the needs you express while we are estimating your project.
To have someone from Kuhl’s Contracting give you an estimate click here.
June 16th, 2017
What is it with squirrels and roofs? They can’t seem to keep their teeth off them. We inspect hundreds of cedar roofs in the Twin Cities area each year. Time after time we find the same types of damage. Lead cap plumbing vent ashings such as the one here (A) are common targets of the squirrels zeal for chewing. Lead cap ashings are also commonly used on asphalt, tile and slate roofs with a similar outcome. If you look closely you can see all the teeth marks.
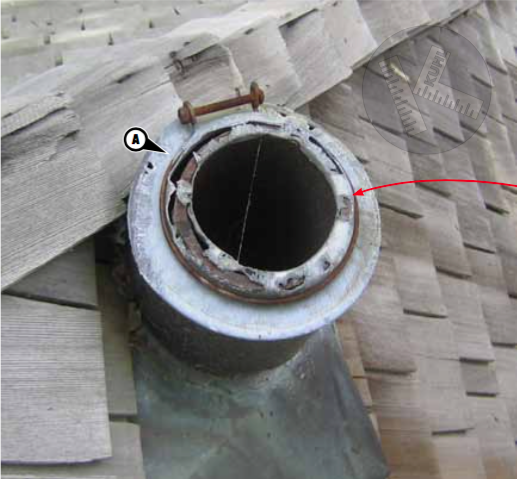
We have resolved this sort of squirrel damage in a few ways. The most obvious solution is to replace the entire lead cap with a new lead cap. This is the easiest solution but the problem is that once your neighborhood critters develop a taste for lead it seems that they just can’t help themselves. They
will contiue to come back and chew cap after cap. We came up with the below solution on one such roof. After being called out three times to x the same leaking ashing we decided to employ a more permanent, albeit expensive, solution.
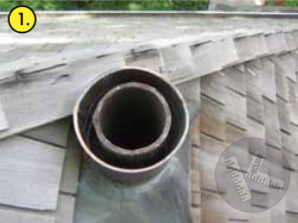
1. Remove old lead cap assembly.
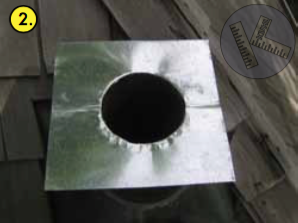
2. Fit galvanized sheet metal lid.
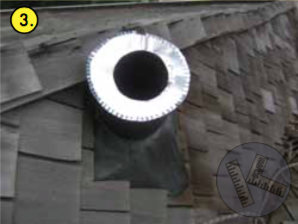
3. Trim sheet metal to a donut with tabs that are about 3/8” inside the dimention of the inner and outer pipes.
4. Crimp the metal tabs down to grip the stack ashing and dive into the cast iron plumbing stack.
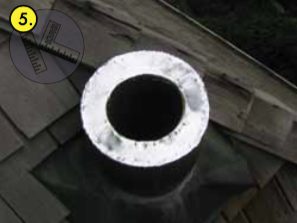
5. Sit back and admire. Oh, but be careful sitting back because you are still on the roof.
June 2nd, 2017
An ice dam is the ridge of ice that forms at the edge of a roof which prevents melting snow from draining as it should. The water that backs up behind the ice dam can leak into the home and cause damage to walls, doors, ceilings, insulation, and other areas. Ice dams usually occur between December 23rd and March 1st in the Minneapolis area.
May 26th, 2017
Thoughts on Ice Dams by Steve Kuhl:
Think of it this way. Ice dams normally migrate over time from the the outer most edge of your eave in towards your home.
If you have gutters, the ice dam will form there first and then grow (migrate) back towards your heated space. Icicles on the outer most edge of your eaves are not necessarily a reason for immediate concern. Ice coming through the soffit or soffit vents is no good. Ice coming down the exterior wall is a very bad thing and means the water is most likely in your wall cavity.
May 19th, 2017
Often times the most difficult thing in resolving a roof leak is to find it in the first place. Roof leaks in Minneapolis present some extra challenges because of the added influence that snow and ice buildup can play. This case study will examine the most common causes of roof leaks in the warm season.
May 5th, 2017
The Problem:
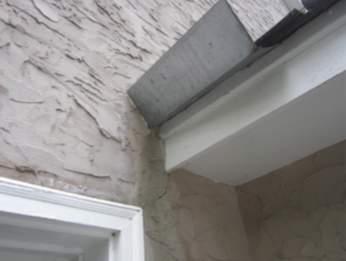
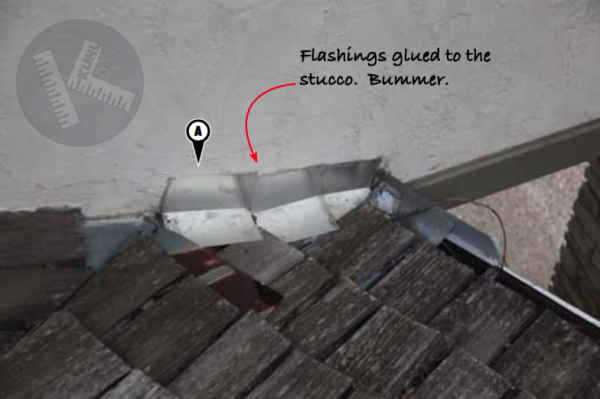
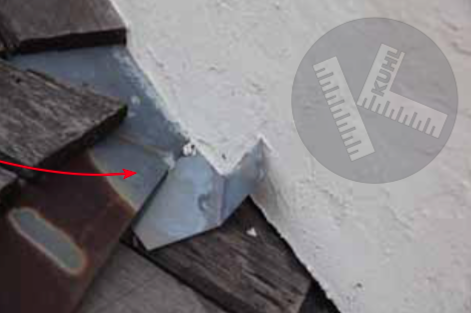
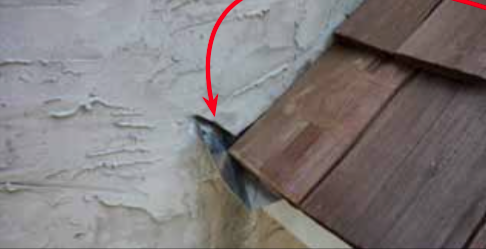
Undoubtedly installing kick out flashings here in the Twin Cities isn’t always as easy as it looks. It’s just a simple piece of sheet metal, after all. To the misfortune of many area homeowners, their contractors, handy-guys and husbands frequently underestimate the complexity of these small projects resulting in some serious problems. The work shown here (A) is a perfect example of how good enough won’t cut it when it comes to installing kick out flashings into stucco. Not seen is the rotten stucco wall directly below this new flashing work. This homeowner’s handyman installed aluminum flashings under the cedar shake roofing (good) but installed the flashings against the stucco wall (bad). Undeniably kick out flashings need to be installed behind siding materials. No exceptions.
The Solution:
We installed two separate kick out flashings in this stucco wall; one at the base of the valley (B) and one at the lower edge of the roof (C). To do this we removed the area of stucco indicated by the dashed line (D). Installing kick outs in existing stucco walls is challenging mostly in that getting the best match of color and texture possible is sometimes a real pain. Can you see the patch in this area?

The new kick out flashing was installed under the existing valley flashing and behind the new stucco patch.
April 28th, 2017
The Problem:
For example you have just had your home inspected and someone says you need kickout flashings. With this in mind what exactly is a kickout flashing and what does it do?
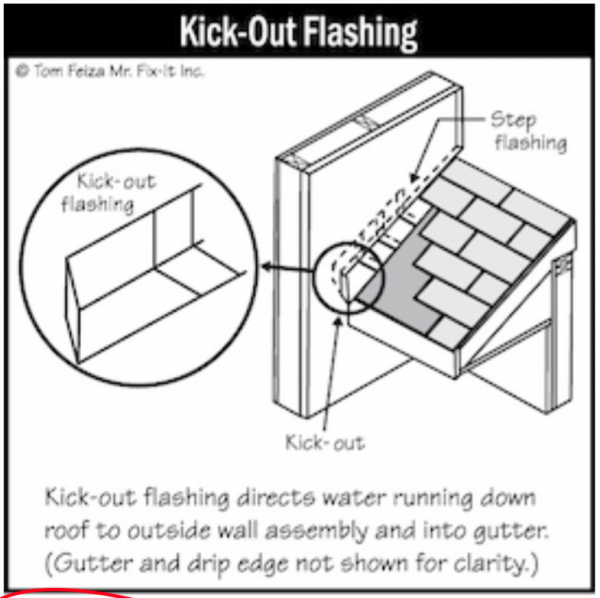
Kickout flashings: Required by Minnesota Building Code, the purpose of a kickout flashing is to direct water off your roof and away from the exterior wall of your home. Depending on your siding and the construction of your home, installing kickout flashings ranges from quite simple to a bit of a challenge. A correctly installed kickout flashing will be installed under the roofing and behind the siding and may require more than one tradesman (as in the case of stucco homes, for example).
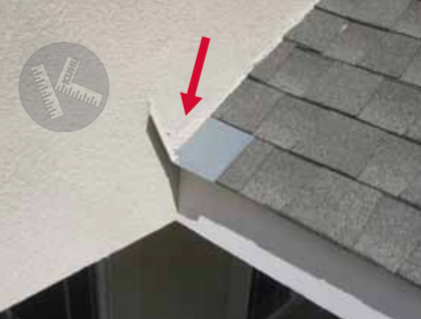
Samples of kickout flashings. Top, a kickout flashing installed in a cedar shingle sidewall. Below, a kickout installed in a stucco wall. Notice that one drains into a gutter and the other doesn’t. Both are common in Minneapolis homes.
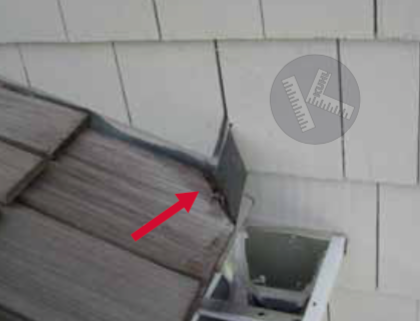
Here is a sample of a kickout flashing installed into an existing stucco wall. Also this is under a new cedar shake roof in Minnetonka, Minnesota. It is possible to use a ultrasonic saw to carefully kerf into an existing stucco wall in a way that allows one to insert a kickout flashing under certain circumstances. From time to time we may need to remove stucco and patch the area after the kickout is installed.

Steve Kuhl has owned and operated Kuhl's Contracting for over 20 years. He prides himself on building strong relationships with customers, and backing it up with superior craftsmanship and job integrity.
Kuhl's Contracting is a leading Twin Cities exterior-remodeling company that focuses on superior quality and customer satisfaction. We're located and operates out of Hopkins, MN.
Click Here to learn more about us.
Call Us, Stop in, or Contact us using our online contact form anytime.
1515 5th Street South
Hopkins, MN 55343
Suite K
(952) 935-9469
Kuhl’s Contracting is the largest installer of ice dam prevention heat tape systems in Minnesota. Our crews travel the country installing the stuff, so if you happen to life near the Twin Cities, you’re in luck! We install the Heat Tape PRO™ Ice Dam Prevention System, the world’s most advanced self-regulating heat cable paired with […]
Our first unfortunate taste of winter in Minneapolis came a couple weeks ago with the unexpected (and unwanted) snowflakes on October 11th. It was a good reminder that you know what is coming. Soon. A little effort invested before the landscape turns white will yield worthwhile benefits in energy costs, comfort and peace of mind. […]
In the Early morning hours of Thursday July 18th, a Hail Storm quickly swept through the souther metro causing Damage to cars, homes and businesses. Several of the Local Twin Cities News Outlets were quick to report on the Hail Damage: 5 EyeWitness News – Hail damages cars at Burnsville hotel Bring Me The News – Large […]
Need Help finding what your looking for?
Use the site-search below:
Kuhl's Contracting services the Twin Cities (Minneapolis & St. Paul) Area, but much of our work can be found in:
Copyright © 2012 - 2025, Kuhl's Contracting. All Rights Reserved.