News & Articles
How to Mount a Bear
August 23rd, 2016
by Aaron Fruit
Edina Homeowner Needed Help With This Unusual Handyman Project
The Problem:
You live on Minnehaha Creek and have this great idea. “I’m going to buy a 400 pound wooden bear”. And then your spouse finds out. Best to get it securely installed so you can start harvesting the praise you’ll need to defend your decision. But who do you call to mount a bear? Yep. You guessed it. You call the guys who have never done it before but who will do just about anything for you (short of actually mounting a real bear).
The Plan:
The Solution:
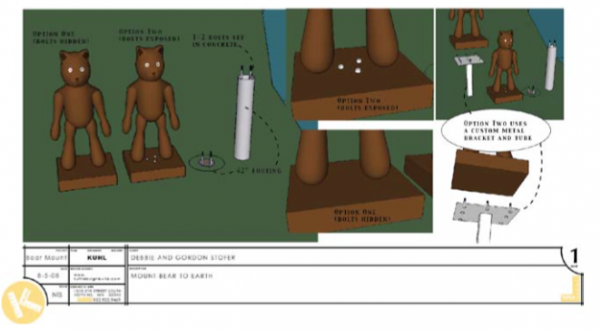
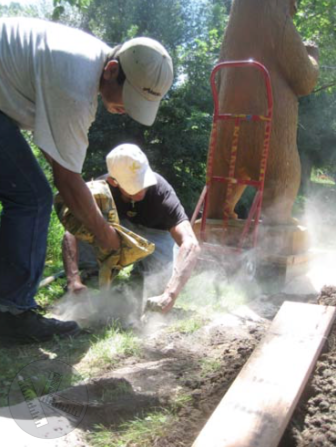
We gave our client two options. One involved fabricating a custom steel armature, affixing the bear to the steel top plate and then sinking the armature in a concrete footing. Super secure. The second, less expensive and slightly less secure option was to pour a footing with some embedded 12” threaded rods to which we would fasten the bear. Our client picked the second option. He later referred us to his neighbor who needed some work on her cedar roof. Mission accomplished.
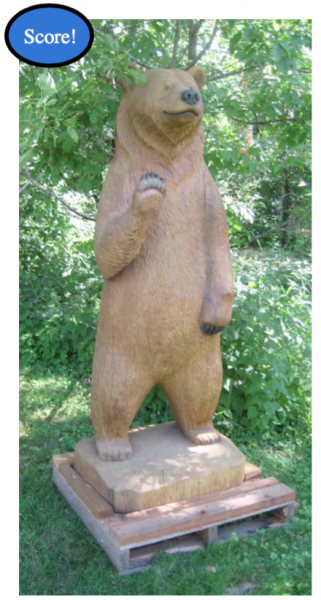
- Bear, bolted to 48″ deep concrete footing.
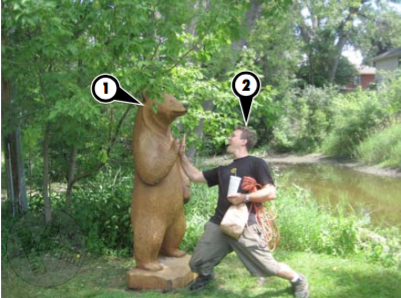
- Steve slapping high fives with the bear.
Posted in Uncategorized
Small Project, Five Trades
August 19th, 2016
by Aaron Fruit
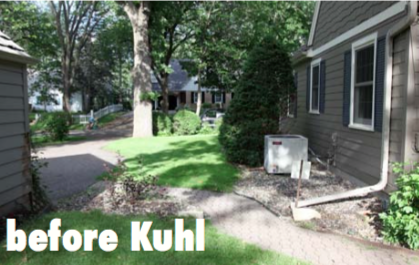
Woman in Hopkins Needs a Simple Stone Wall With Custom Features
The Problem:
You’ve dreamed of a charming stone wall between your home and garage for years. You called a mason but he wouldn’t touch the little spot of rotten siding on the garage where the wall would sit near. He also doesn’t have a guy to make your custom steel strap hinges for the thick custom wood door (that he also wouldn’t touch). Oh, and even though he is a master mason that can stone his way out of any situation, he can’t design for beans, so you need to find someone who understands how all of this can come together. Ideally, you should call someone who has a dedicated team of people who know how to work together. It’s time to Kuhl it.
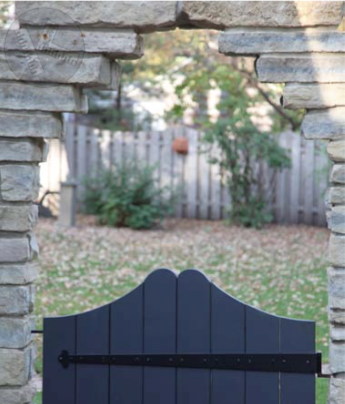
The Plan:
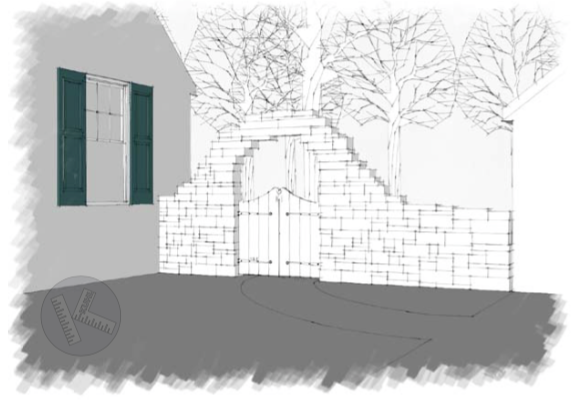
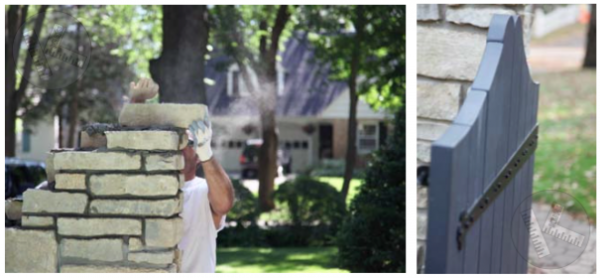
The Solution:
‘Simple’ stone wall trade summary: Stone mason, carpenter, iron worker, painter and designer.

Posted in Uncategorized
Chimney Caps and Frost Wedging
August 12th, 2016
by Aaron Fruit
Minneapolis Chimneys Need Caps No Matter What…Here’s Why.
The Problem:
Is Mother Nature giving your chimney a frost wedgie? We’ve seen it hundreds of times around the Minneapolis-St. Paul area. A masonry chimney with one damaged clay flue and one pristine flue. Most people might assume that the flue that gets used frequently might fail sooner than the unused one. Or, that the one that is open to the weather is more likely to fail than one filled with concrete. Neither is true. In fact, the number one determining factor in hastening the demise of a clay flue liner is whether or not it has a cap. By ‘cap’ we mean anything that protects the top edge of the clay liner from the elements.
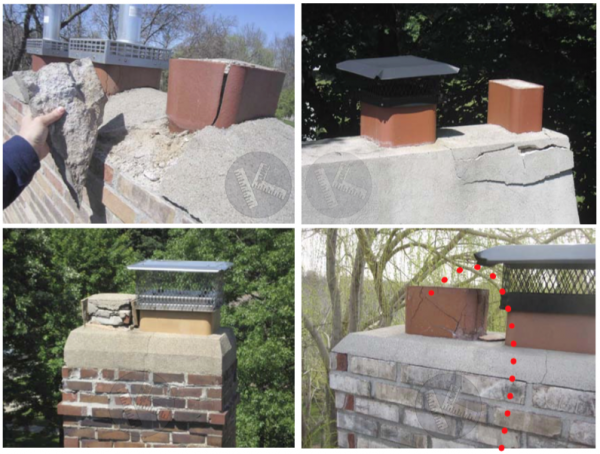
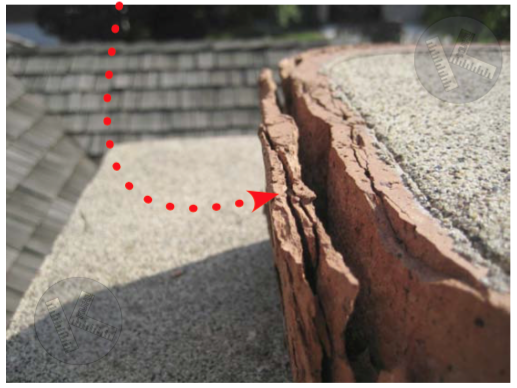
When water freezes it expands with incredible force. An exposed edge of clay flue liner, as seen here, is relatively vulnerable to this damaging cycle. After this process destroys your flue, it keeps working its way down into the body of your chimney. That’s when things get really expensive to fix.
The Solution:
The solution is pretty simple. Cap all clay flues. Concrete fill, as in the case with many passive, or ‘dummie’ flues will not protect your ue from our wicked freeze-thaw cycles.
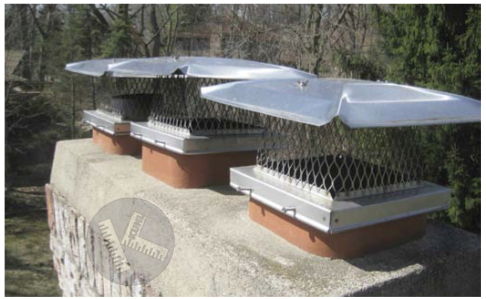
Installing the typical steel chimney cap, such as the ones shown here, ranges from $125-350 per location depending on flue size and height off the ground.
Posted in Uncategorized
Hear. See. Speak. We’ll Tell You What We Find.
August 9th, 2016
by Aaron Fruit
Minnetonka Homeowner Hears the Truth from Roof Cleaning Contractor with Integrity
The Backstory:
It’s not considered bad-mouthing your competition when you don’t name names, right? We were the third company to review this 13 year old cedar shingle roof and provide a cedar cleaning and sealing estimate. By the time I arrived, the client was understandably weary. So far, two companies, two opinions. And now here comes this guy wearing crocks with a big yellow dog in his car. The client had made it pretty clear that if I wasn’t the low bid he was going to go with the second bidder because ‘the guy was nice’. “Dang”, I thought. “I hate competing against nice guys”.
The Problem:
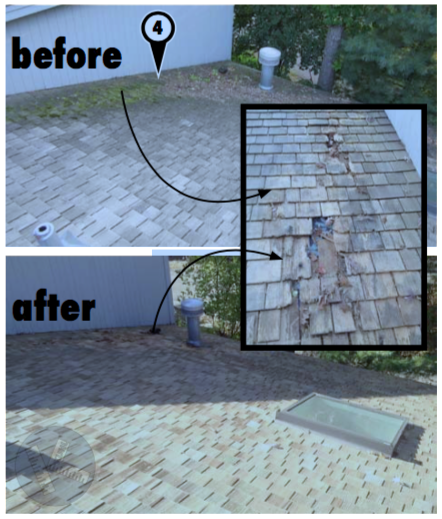
During the roof inspection I noticed a subtle soft spot in the roof deck at location (1). I asked to climb up in the attic. I immediately saw the result of an ongoing roof leak (2) and (3) that had been doing bad things quietly above the vapor barrier for some time.
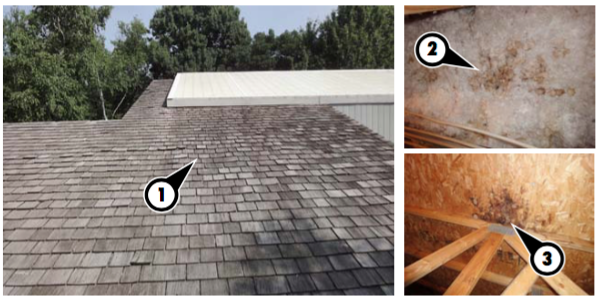
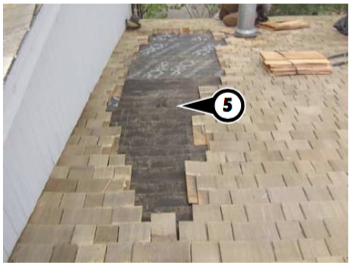
I also noted that while the majority of the roof was worth restoring, one section would require replacing after we washed the roof (4). “The nice guy said he’d include 55 shingles in his bid and that’s all my roof needs”, he said. “Fair enough”, I replied, “But this area alone will require about 120 pieces so I’ll have to respectfully disagree” (5). Fifty-Five cedar shingle replacements would have left this roof in pretty lousy condition, not that the client would ever know. I stuck to my guns and told him exactly what he didn’t want to hear. This was a bigger project than he anticipated.
The Solution:
We washed, repaired and preserved this entire roof. We diagnosed and remedied an issue with the skylight flashing that the nice guy didn’t have the experience to find (or integrity to mention). Our estimate for this work was roughly twice what the nice guy’s bid but this job was done right.
Posted in Uncategorized
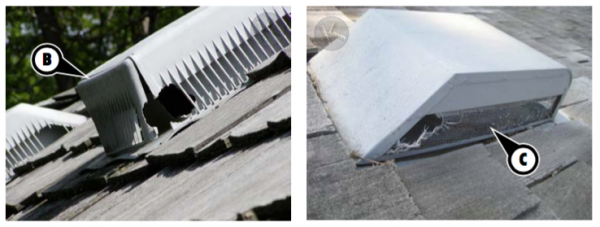
Animals in Minneapolis Roof Vents, Part One
July 29th, 2016
by Aaron Fruit
How to Keep Birds, Bats, Mice and Squirrels Out of Your Home
The Problem:
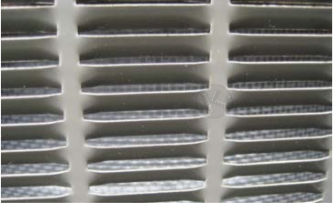
If you have lousy roof vents, don’t feed bad. About 60% of the roofs in Minneapolis that we inspect do. There are three common types of crappy roof vents in Minnesota:
- Plastic turtle-style (A)
- Plastic louvered (B)
- Non-louvered metal vents (C)
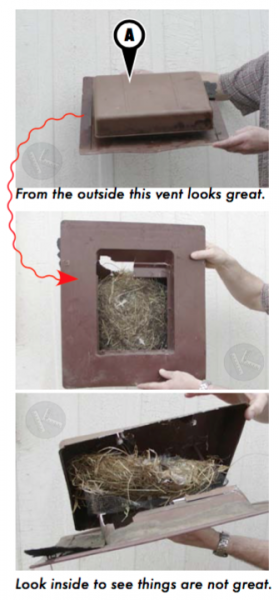
We took a typical plastic roof vent to a band saw and sliced it in half. (Yes, we are geeks). Here are the fatal flaws that exposed within:
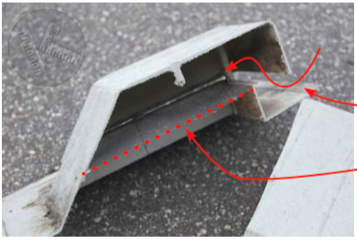
- Design allows animals to crawl under the hood and onto the screen where they either nest or enter the home.
- Layer of screen is made of lightweight aluminum. Animals chew through it was ease.
The Solution:
The solution to animals getting into an attic through cheesy roof vents is to replace them all with metal, louvered vents. Most homes have an average of 9-14 vents on the roof. Even if only one or two of you existing vents have critter problems you must replace every vent on the roof if you want to solve the problem.
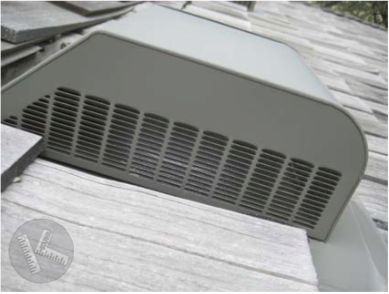
Up close look at the metal louvers
Posted in Uncategorized
Roof Snow Removal in Minneapolis
July 15th, 2016
by Aaron Fruit
How Using a Roof Rake Can Make Ice Dam Problems Much, Much Worse
The Problem:
You learned your lesson in the winter of 2011 with the epic ice dam outbreak that hit Minnesota. You read up that removing snow from your roof will prevent ice dams. Ice dams get their fuel (i.e., water) from the snow on your roof after all. Remove the snow, remove the problem. So this winter you buy a roof rake, brave the cold and remove as much snow from your roof as you can leaving a small section of snow still in place higher on the roof that you couldn’t reach. A few weeks pass and bam! You see water leaking through your ceiling and it is even worse than the winter of 2011. How can this be? The answer lies in a phenomenon we call the ‘double dam’, something we have seen over a hundred times in the past decade alone. Our graphic below helps explain the how and why.
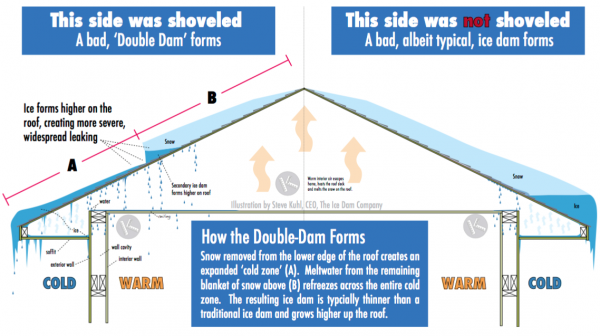
Of the two ice dams illustrated above, the Double Dam presents a couple of challenges beyond those of the regular ice dam. First, because ice has grown further up the roof slope, the subsequent leaks inside will cover a wider area. The second problem with a Double Dam is the cost of removal. Although half the thickness may take two to three times longer to remove than a regular ice dam. More time equals more money.
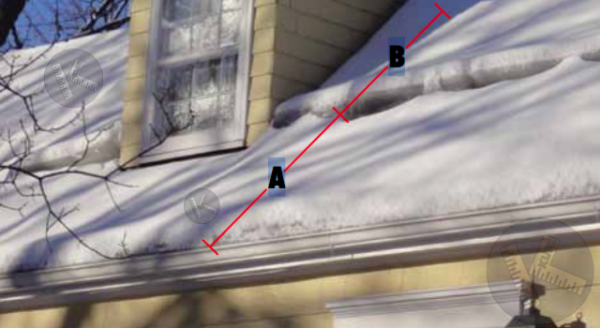
Shown above is a very typical Double Dam. This home in Edina had leaking from both ice dams and the cost to remove them was tremendous. Area A is where the average ice dam likes to form. Area B only forms when someone does an incomplete snow removal job from the roof. So what is the take-away from this case study? Remove all the snow from roof slopes than may produce an ice dam or remove none at all. While the latter may result in an ice dam happening at the very least it won’t be a Double Dam.
Posted in Uncategorized
Two Ways of Sealing Recessed Lights
July 1st, 2016
by Aaron Fruit
Save on Heating Bills and Reduce the Likelihood of Ice Dams in the Twin Cities
There are two ways of sealing recessed lights and there are advantages and disadvantages of both.
Sealing Recessed Lights
Advantages
- Cheap and fast
- Blocks warm from leaking through the gap between the fixture body and the ceiling drywall.
Disadvantages
- Does not address the heat loss generated by the fixture or the air leaking through other perforations in the body of the fixture.
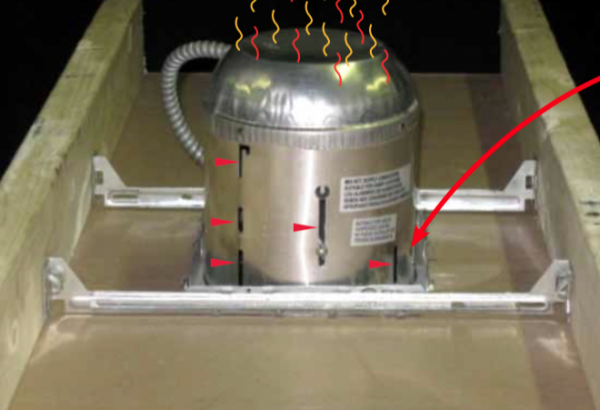
Boxing & Sealing Recessed Lights
When a recessed light is Boxed and Sealed the entire fixture is encased in a box of insulation and sealed to the drywall.
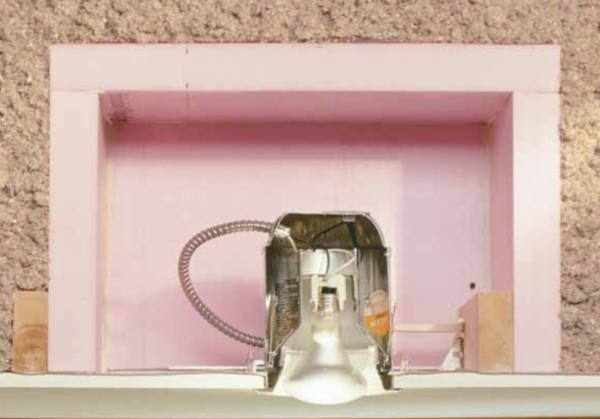
Advantages
- Prevents heat loss and all warm air leakage around the recessed fixture.
Disadvantages
- Not easy to implement in tight areas and is more expensive than simple air sealing.
Posted in Uncategorized
Blending New Cedar Shakes With Old
June 24th, 2016
by Aaron Fruit
Minneapolis Cedar Roof Expert Gives Examples of Cedar Roof Repairs
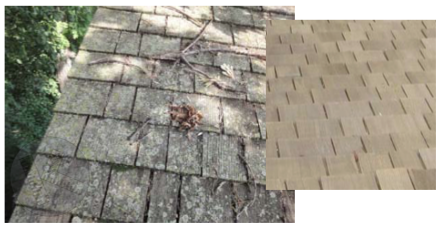
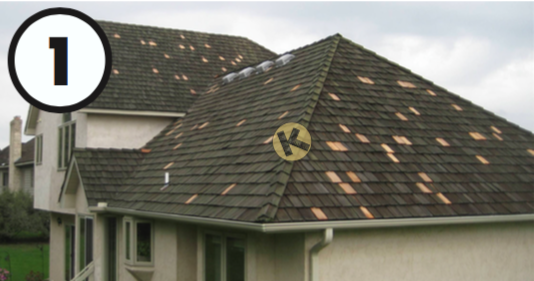
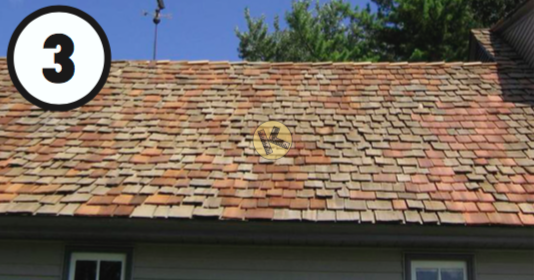
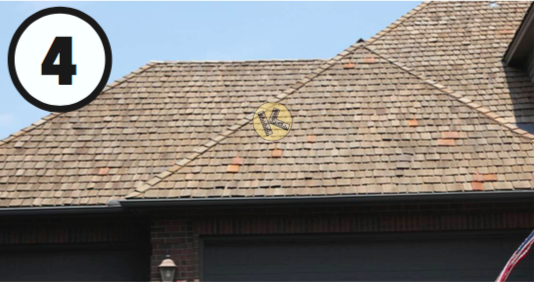
We are often asked about how cedar shake repairs will look compared to the surrounding roof. Here are a bunch of examples of projects where we repaired cedar shake roofs and the differing degrees color variation between new and old cedar materials. If a near match is your goal, you may consider having your roof washed.
- Unwashed 19 year old shake roof with fresh repairs.
- 13 year old shake roof with area repair two years after installation.
- Washed 17 year old shake roof with many repairs.
- Washed shake roof with new repairs.
- Unwashed 15 year old shake roof with repairs.
- Washed 16 year old shake roof with repairs.
- 14 year old roof with small area washed. Note how the repairs blend differently in the washed and unwashed areas.

Posted in Uncategorized
Minneapolis Sheet Metal Contractor of the Year
June 10th, 2016
by Aaron Fruit
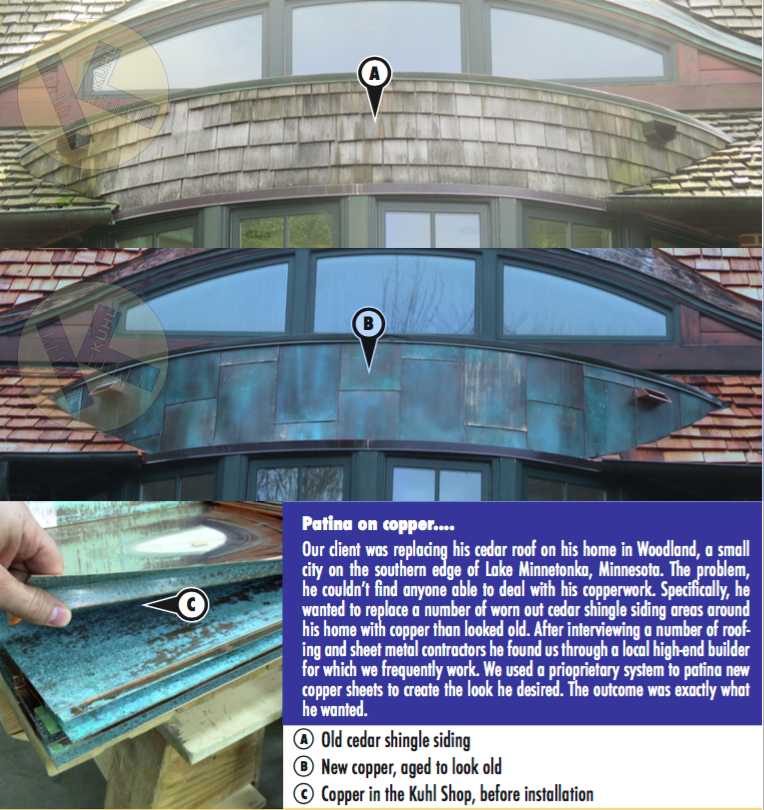
How to Age Copper to Blend in With Existing Copper by Creating a Patina
Patina on copper….
Our client was replacing his cedar roof on his home in Woodland, a small city on the southern edge of Lake Minnetonka, Minnesota. The problem, he couldn’t find anyone able to deal with his copper-work. Specifically, he wanted to replace a number of worn out cedar shingle siding areas around his home with copper that looked old. After interviewing a number of roofing and sheet metal contractors he found us through a local high-end builder for which we frequently work. We used a proprietary system to patina new copper sheets to create the look he desired. The outcome was exactly what he wanted.
Posted in Uncategorized
Does Sun Cause Ice Dams?
June 3rd, 2016
by Aaron Fruit
Observations From the Experts on the Relationship Between Sun and Ice Dams
Experience tells us that all ice dams are created when there is an area of the roof that is above 32 degrees that creates snowmelt which then runs down to an area of the roof that is below 32 degrees. Seems logical enough. We also know that the cause of this temperature differential is more often than not the result of interior heat loss, specifically via air leaks and insulation issues relating to quality or quantity. There are, however, situations where perfectly constructed, well ventilated, air-sealed and insulated structures develop ice dams. This illustration describes such a situation.
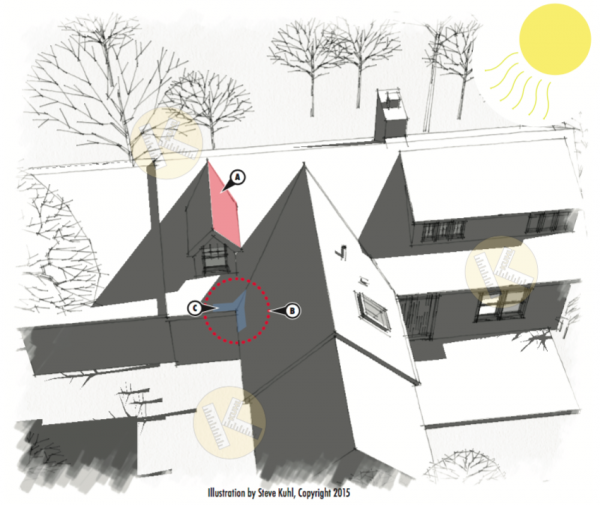
In northern areas of the country the declination of the winter sun, mixed with the particular posture of a home on the land can result in certain areas of the roof never seeing direct solar radiation. Study the shadows above to see such an example. In this case, the sun heats up the roof pitch on the dormer (A), the resulting melt water runs down to an area of the roof (B) that never sees direct sun light and it refreezes as a result into an ice dam (C). These are particularly challenging ice dams to prevent. Often times heat cables are the only affordable option.
Posted in Uncategorized