Heat Tape Installation : Ice Dam Prevention
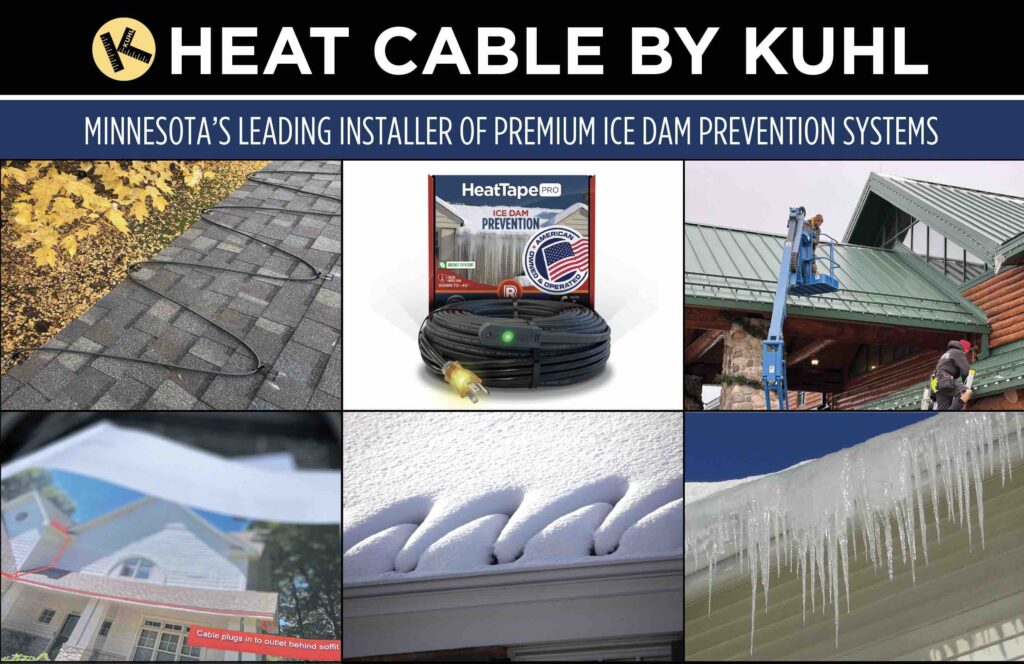
Kuhl installs the highest quality ice dam prevention heat tape systems under the sun. Okay, under the snow. Here’s how it works:
Step One: One of our experienced estimators visits your home to discuss your concerns. You talk, we listen. We identify the trouble spots, take photos and measurements and bring the info back to the mothership to design the best solution for your ice dam problems.
Step Two: We quickly generate the most impressive estimate you’ve ever seen. Fair numbers, clear scope of work, detailed descriptions of what you are getting and what it costs, broken out zone by zone along with any itemized options we discussed during our time with you.
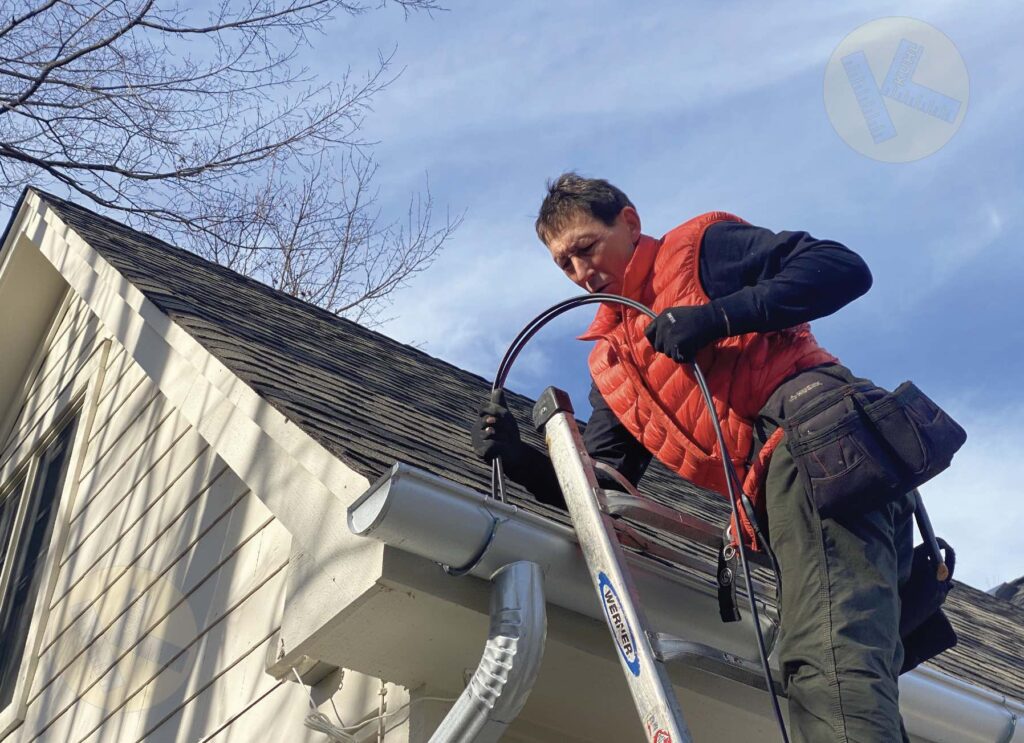
Step Three: The work is done, quickly and professionally. This isn’t our first rodeo. Our techs will walk you through system operation (i.e., here’s where it’s plugged in, etc.).
Why Hire Kuhl to Install Heat Tape On Your Home?
35 Years Experience. Kuhl’s Contracting is one of the most well respected, veteran exteriors companies in the Twin Cities. Founded by Steve Kuhl in 1987, we are a tight group of professionals dedicated to the art of keeping people happy through quality work, whether that be roofing, gutters, masonry or heat cable. We have lots of skin in the game.
10 Year warranty. That’s right. KUHL uses the most innovative, high-quality heat cable system in North America. Heat Tape Pro™ is a premium, heavy-duty self-regulating heat cable surrounded by an ecosystem of the most innovative, roof-safe installation accessories in the world. Ask our competitors about the system they are installing. If they don’t brag about it or provide exhaustive details about it, you may want to think twice. No one installs a higher quality ice dam prevention system than KUHL.
1 Company to Call. We know what we are doing on work you really, really need to be reliable. We have installed more heat cable systems than any contractor in Minnesota for a reason. Check out our online reviews. Your friends and neighbors are saying nice things.
How Much Does a Heat Cable System Cost: Average Costs in Minnesota?
Good question. Heat tape systems in Minnesota reflect national averages, with the final cost being determined by a few important variables, the most important of which is length (i.e., how much cable are we installing).
Most important variables in determining the cost of your heat cable system:
- Length of cable: How many feet are we installing and in how many sections? We normally install ice dam prevention heat cable in more than one area, but every project is a response to the particular problems found.
- Type of cable: Kuhl only works with the finest quality cable, Heat Tape PRO, which is a self-regulating, commercial-grade heat cable with a 10-year warranty. You can find much cheaper cable at the hardware store but we won’t touch it. (See info on Constant Wattage heat cable below).
- Type of installation: Heat tape installed on a basic asphalt shingle roof will cost less per foot than one installed on a metal roof due to the complexity of the work and cost of installation accessories.
- Site conditions: If the work area is super high or otherwise difficult to access, the cost of installing your heat cable may be slightly more.
- Power source: Most of the heat tape systems we install are simply plugged into nearby outlets. On occasion we need to pull in our electrician to install a new outlet, circuit or wire up a sophisticated control system. Electrician involvement will increase the cost of heat cable installation projects.
- Experience: Yes, you get what you pay for when it comes to working with heat cable contractors. We work on every conceivable roof type, height and slope. Wood roofs, metal roofs, rubber, flat, synthetic, slate, tile, torch down, asphalt and more. If it keeps water out of a structure, we understand how to install de-icing cable on it.
Heat Cable Project Cost Analysis – Minneapolis Minnesota
| Project | Cost | Footage | Cost/ft | Cable | Ice Dam Prevention System Description |
|---|---|---|---|---|---|
| Minnetonka Heat Tape on Gable Roof | $485 | 37 | $12 | Heat Tape PRO | Cost for one area of de-icing cable in valley and small gutter, including downspout and related accessories. ThermaCord Controller included |
| Minneapolis Heat Tape on Gable Roof | $2525 | 180 | $14 | Heat Tape PRO | Cost for two sections of heat tape installed on Cape Cod-style story and a half, easy access, plugged into existing outlets, minor modifications to gutter guards, CableGuard installed in gutter |
| Edina Heat Cable on EPDM Roof | $3200 | 200 | $12 | Heat Tape PRO | Installed price for field assembled heat cable system, two areas including rubber membrane and addition of one 20 Amp outlet for power supply |
| Excelsior Heat Cable on TPO Roof | $1255 | 75 | $16 | Heat Tape PRO | Price to professionally install plug-in ready, pre-terminated, self-regulating de-icing cable installed on high flat roof and into commercial downspout |
| Edina Heat Cable on Shingle Roof | $4850 | 225 | $14 | Heat Tape PRO | Installed cost for field assembled self-regulating heat cable including end seal kit, power connection kit, Grip Clips™ and DS8-C controller, with dedicated circuit and remote snow sensor |
Is Heat Cable the Right Answer to Your Ice Dam Woes?
If you have ice dams that continue to cause you headaches, heat tape may be the answer. Professionals in the industry all recognize that heat cable may not be the very best solution for ice dams, but it is the most reliable and most affordable. The best solutions often involve spending tens of thousands on architectural enhancements to your home including modification of the insulation and ventilation systems, in addition to sealing up hot air leaks. If you would like to geek out on the topic of ice dam prevention, visit the three part series Steve Kuhl wrote for the Star Tribune on the topic.
Heat cable, also called heating coils, de-icing cable and heat tape, is a solution that allows property owners to target specific areas of concern with a reliable solution. Why pay to insulate an entire attic when the ice dam problem is only in one valley? It’s safe to say that Kuhl’s Contracting has installed more heat cable on residential, commercial and industrial properties in Minnesota than any other company. We are frequently used as sub-contractors for the most well-respected builders and developers in the greater Twin Cities area. Why? Because we have the most well-triangulated understanding of ice dam causation and prevention strategies. Through our sister company, The Ice Dam Company, we have traveled the United States removing ice dams and preventing ice dams, addressing projects of varying complexity and scope. All you need to do is simply compare the detail and scope of our proposals to understand who knows their stuff and who installs heat cable to fill in their schedule.
Seven Questions to Ask Your Heat Cable Installation Contractor
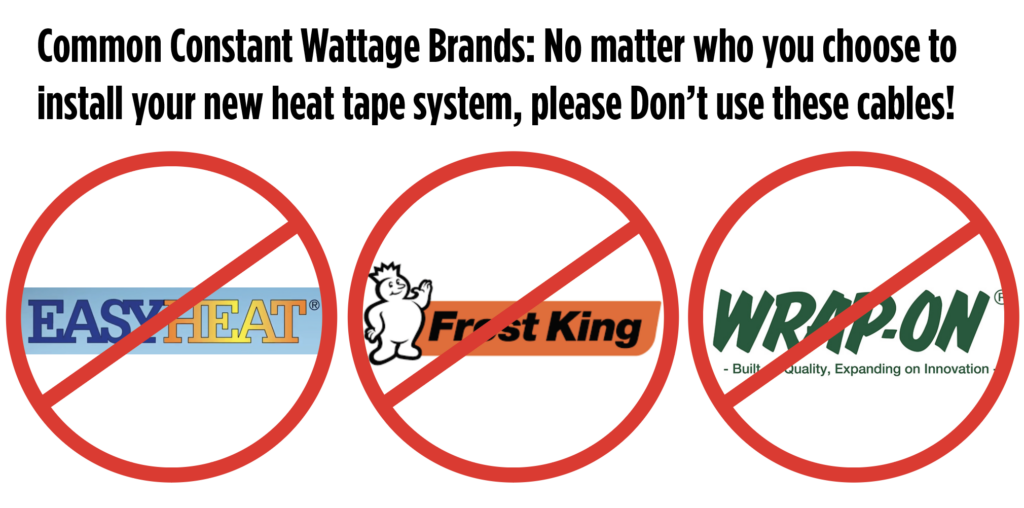
- Cable Type: What heat cable system are you installing? Avoid constant wattage brands including EasyHeat, FrostKing, Wrap-On or any cheap products bought online. Only install a long-lasting, self-regulating heat cable. Always ask for the technical documents relating to the heat cable being proposed.
- Cable Warranty: How long is the manufacturer’s warranty on the cable you are installing? Constant wattage heat cable systems are warrantied for a maximum of only 1-2 years. Heat Tape Pro™ carries a 10-Year warranty. Ask for the warranty information in writing.
- Safety: Is your cable safe to install on my home? Constant wattage heat cables are not UL approved for installation on flat roofs, rubber roofs, wood, metal or any material other than sloped asphalt shingles. Ask your installer to see the cable manufacturer’s installation manual before work begins.
- Experience: What is the installers primary line of business? Are they a licensed contractor? How many heat cable systems have they installed heat tape? Are they experienced in all types of roofing, flashing and gutter systems? Can they provide proof of insurance?
- Maintenance: Do leaves need to be removed from around my heat cable after it’s installed? Constant wattage heat cables are not supposed to have prolonged contact with leaves or other combustibles. To avoid risk of fire, combustibles must be cleared away from the cable on a frequent basis. Read their manual.
- Repairable: Can my system be repaired if it is damaged? Constant wattage heat cables CAN NOT be repaired under any circumstance. The cable must be thrown away if even slight damage occurs (Squirrels!). Heat Tape Pro™ is a heavy-duty self-regulating heat cable that is simple and affordable to repair.
- Roof-Safe: Will the accessories used for my heat cable installation threaten my roof warranty? If you have an asphalt shingle roof, membrane roof, metal roof, synthetic roof or wood roof, make sure you understand the heat cable accessories being specified for your project because roof manufacturers warranties can be affected by the use of improper devices.
Using De-Icing Heat Tape for Ice Dam Prevention on Roofs and In Gutters
We have used a variety of heat cable (i.e., ‘Heat Tape’) over the past 25 years. No serious contractor installs the de-icing products commonly available at big box stores known as constant wattage heat cable. Commonly sold under the brand names of Frost King, Easy Heat and Wrap-On, these products are cheaply made with warranties not much longer than fresh produce. One of many significant issues with constant wattage is safety. It is never supposed to be in contact with combustibles (i.e., leaves or pine needles). Unless you’re in the mood to keep your heat cables away from that stuff, it’s best to avoid cheap cable.
We are proud to install the Heat Tape Pro™ Ice Dam Prevention System, made by Radiant Solutions Company. This is the most innovative, reliable and long-lasting self-regulating heat cable available in North America today. Our proposals are the most detailed in the United States because we want you to understand what you are buying.
Many professional contractors and handymen still install cheap cable because they either do not understand the difference or prefer simple, DIY-friendly products (we’re talking about you Easy Heat). Here are some differences between the two major varieties of ice dam prevention heat cable available in the North American market today (i.e., Self-Regulating versus Constant Wattage):
Installing Quality Heat Tape Makes All the Difference
Self-Regulating Heat Cable versus Constant Wattage Heat Cable
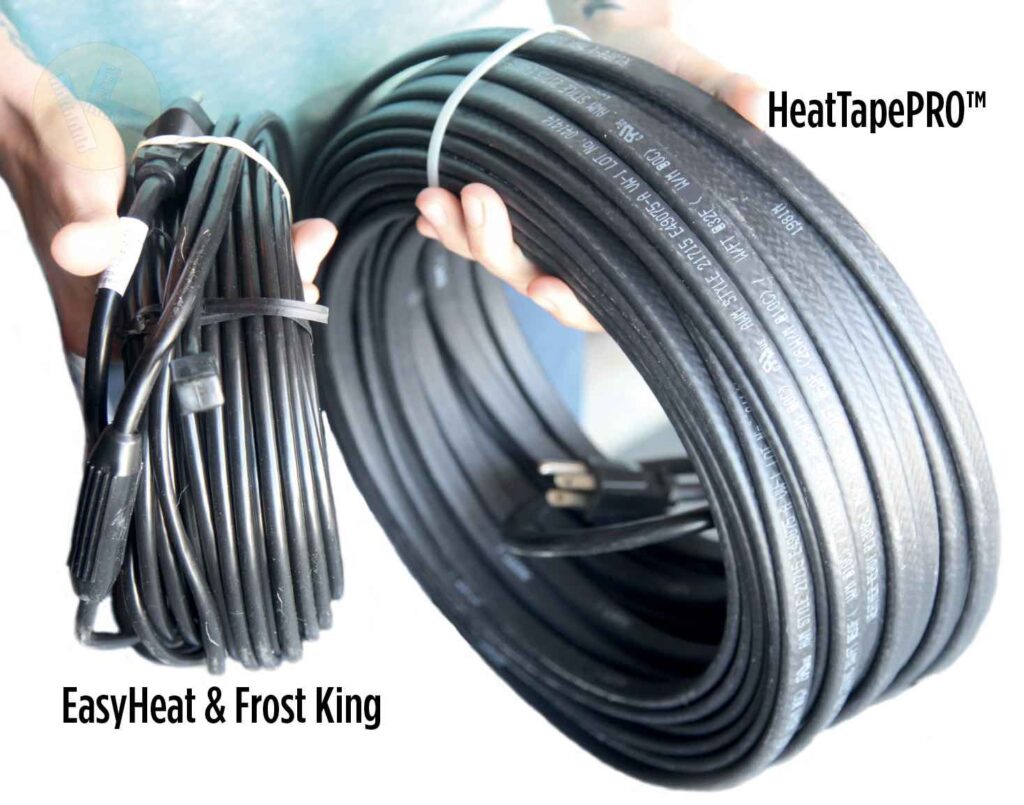
As the name suggests, self-regulating heat cable responds dynamically to changes in outdoor temperatures, using as much as 40% less energy on warm winter days than cold winter days. Smart stuff, but how does it work? In short, specialized polymers in the conductive core of the cable ‘ask’ for more energy as temperatures drop and less when temps rise. Constant wattage heat cables demand the same energy regardless of surrounding temperatures.
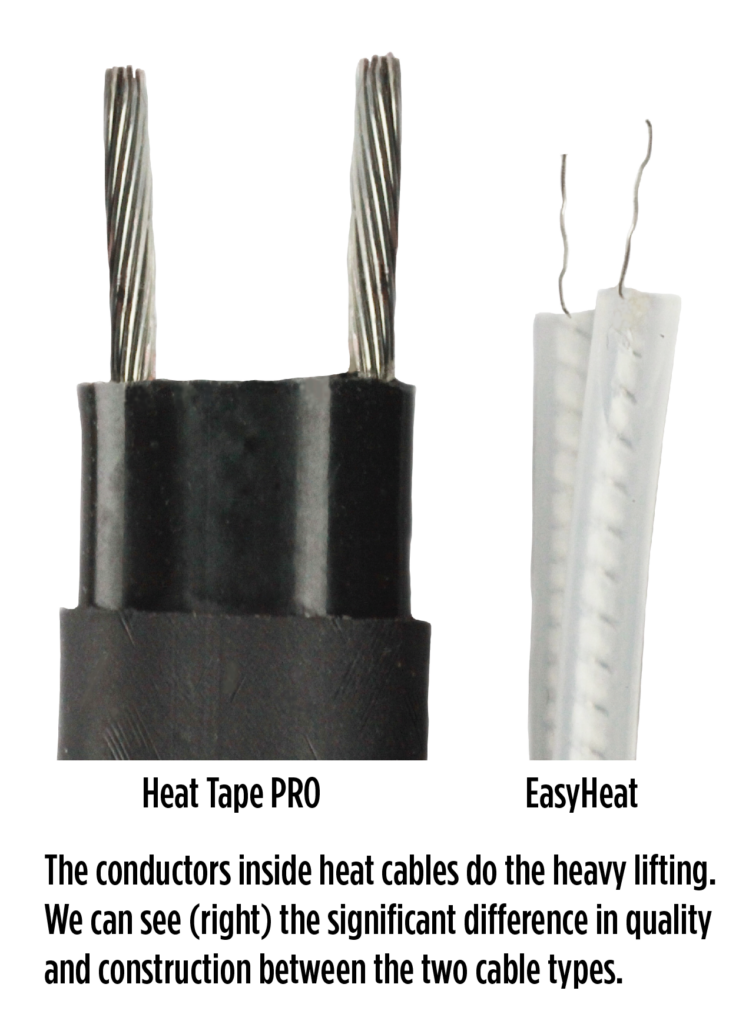
In addition to poor efficiency, the difference in construction quality between these two types of cable is also obvious by looking at the dissection below. Regardless of what company you choose as your heat cable installer, make sure they use self-regulating cable.
Heat Tape Installation in Gutters & Downspouts for Ice Control
There are certain circumstances when installing heat tape in gutters alone is an appropriate response to problematic ice. For example, if your primary issue is water leaking into your foundation it becomes essential to get water away from the perimeter of your homes. That means collecting it in the gutters and funneling it through the downspout out and away from the foundation. This is a perfect job for a single line of Heat Tape PRO self-regulating heat cable. To summarize, If you have gutters you will want to run heat cable along the horizontal sections and vertically down the downspouts to allow water to escape. This is true whether or not you have ice dam issues on the roof.
Here comes the controversial part. There seems beto a lot of confusion among homeowners and contractors alike about the relationship between gutters and ice dams, so let us be very clear: There is NO relationship between gutters and the formation or severity of ice dams. Put another way, ice in gutters does NOT cause ice to build up on the roof, at least not high enough on the roof to cause the primary problem associated with ice dams, which is water leaking into the structure. See diagram below:
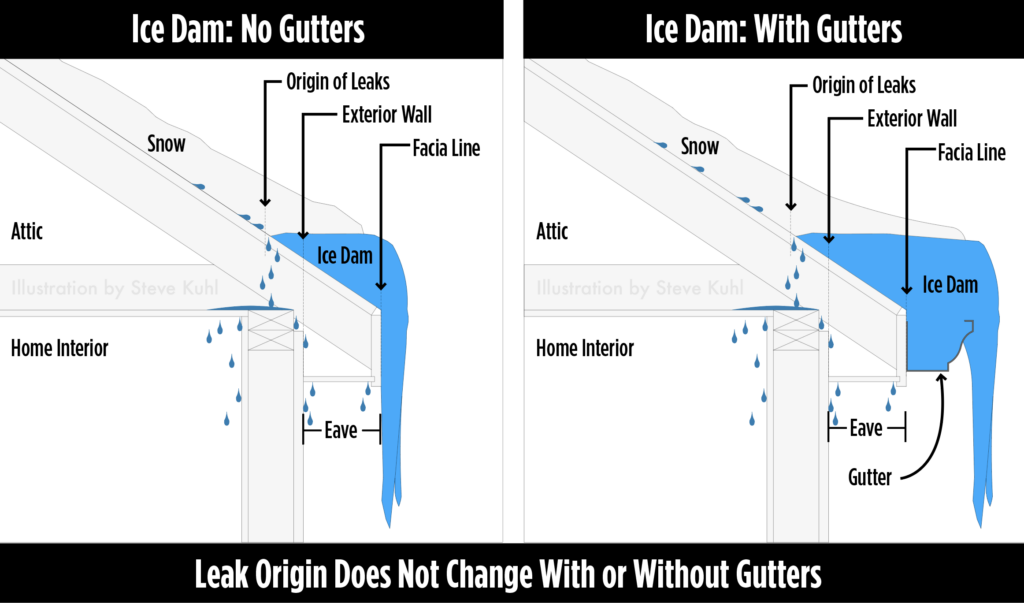
Ice dams will form along the cold edge of a home (eave) regardless of the presence of gutters because ice dam formation is a function of the basic physics related to where roof meltwater freezes. It will freeze at the cold edge of the roof whether or not gutters are there. In the illustrations below, notice that while the size of the ice dam may be larger when gutters are present (right), the origin of the leaks caused by the ice dams does not change. The ‘origin point’ is a function of the relationship between the exterior wall and roof above. The existence of a gutter has no effect on that origin.
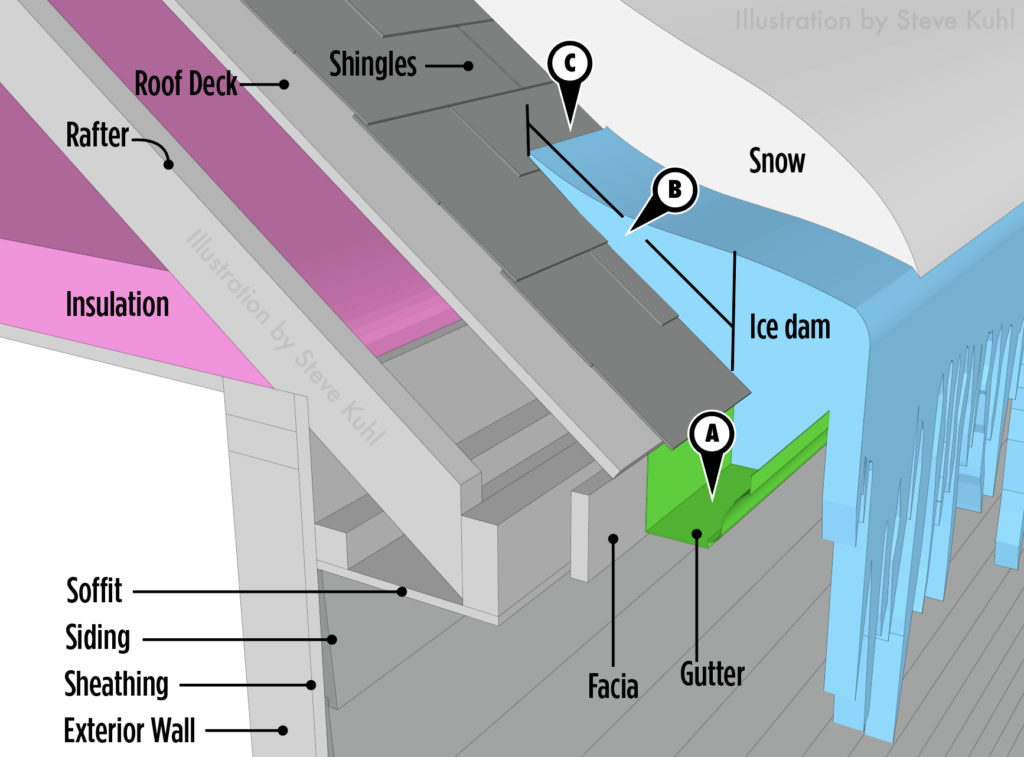
The rendering, above, illustrates our point by showing the proximal relationship between a heat cable installed in a gutter (A) and the body of the ice dam. Notice that the ice dam in area (B) will form whether or not a gutter is in place, or if a heat cable of any wattage is installed in that gutter. Likewise, the leading edge of the ice dam (i.e., the ‘origin zone’ for the leak) remains the same around area (C). Heat cables work by creating a melted pathway from the roof surface, through the origin zone and off the edge of the roof. This explains why most heat cable manufacturers recommend installing heat cable 6″ beyond the intersection of the exterior wall below.
Therefore, keep in mind that installing heat cable in gutters alone will NOT prevent ice dams. This is a common myth. Ice dams are roof phenomena and will occur on the roof regardless of whether or not gutters are present. That said, as we mentioned above, having gutters filled with ice can bring along its own set of headaches so always make sure to run heat cable in the gutter system as a part of an overall comprehensive ice dam prevention system.
Installing Heat Cable on Different Roof Materials
Here are some specific heat tape installation case studies to help you understand how the roof material dictates the specific design of the ice dam prevention system.
Asphalt Composite Shingle Roofs: Heat Tape Installation

Also known as ‘composite’ shingles, asphalt shingles comprise the vast majority of the residential roofing systems in the United States and Canada. Given its prevalence, it is also the most commonly affected roofing system by ice dams. The most common locations for ice dams on a home are of course in valleys on the eaves (a.k.a, overhangs). That said, problematic ice can cause headaches in many different areas including: Around skylights, vents, roof-to-wall intersections, low slope and flat roofs and where roof slopes intersect to form what we call ‘pinched’ zones that encourage snow and ice to collect.
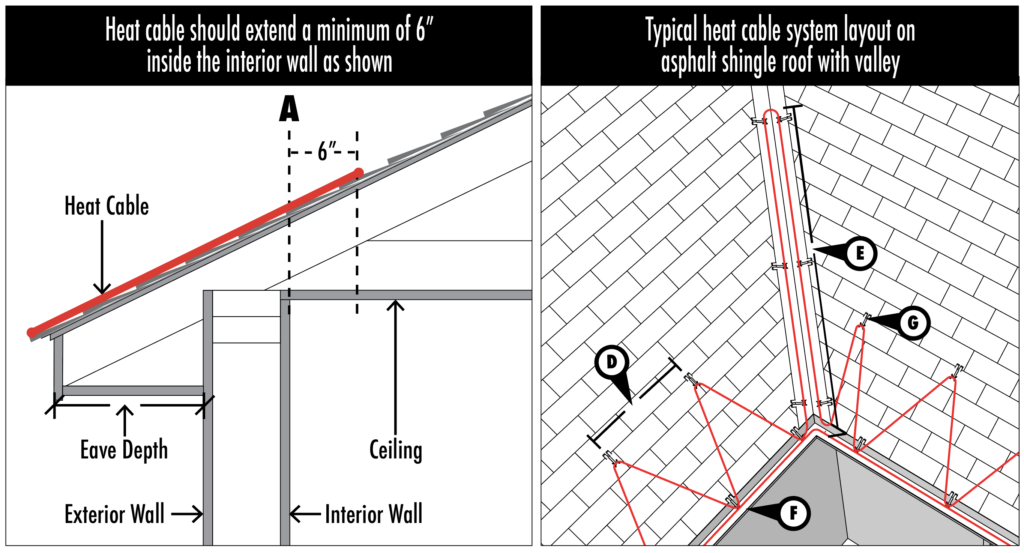
Installing heat cable on an asphalt shingle roof is about as simple as it gets. The heat tape clips are installed to create a classic serpentine, or ‘zig-zag’ cable pattern, with each clip spaced about 24″ apart under normal circumstances. We refer to this as the ‘tracing width’. The tracing height (see drawing below) refers to how high the cable goes up onto the roof and is determined mainly by the depth of the eaves. The deeper the eave, the higher the cable needs to go up onto the roof. A basic way of understanding why this is can be seen in the diagram below, which illustrates a simple concept. The purpose of heat tape when used for ice dam prevention is NOT to melt large areas of snow and ice away but rather to create melted pathways that water can use to escape off the roof system during wintery months. When that water doesn’t escape, it often gets forced back into the roof system and into the home. Bad news.
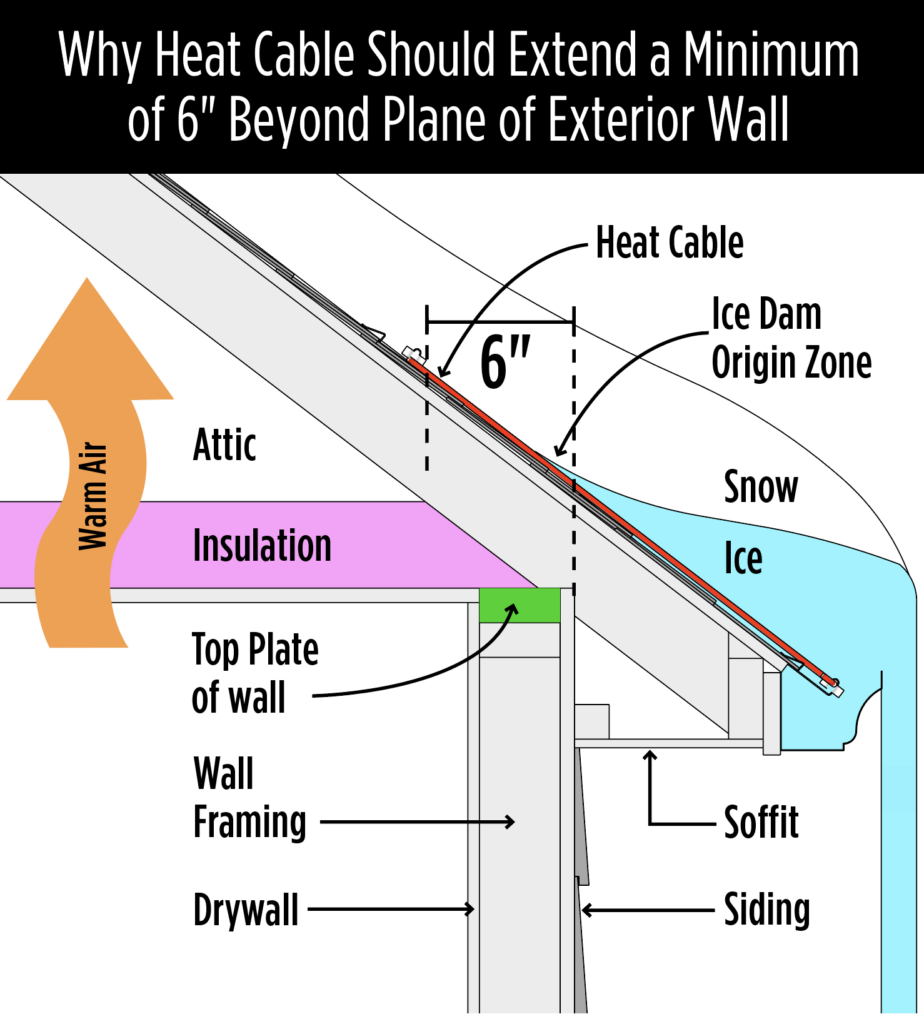
As you can see in the drawing above, heat cables need to be installed roughly 6″ above the intersection of the outer wall of the home and the sloped roof above. The ‘origin zone’ for ice dams in locations like this is right above the top plate of the exterior wall system. If heat cable doesn’t extend beyond that origin, it will not create the all-important melted pathways needed for meltwater from above to escape.
The 6″ Rule is simply this. The height of the heat cable tracing pattern–how far up the roof the cable is installed–is determined by the ‘Origin Zone’ of the ice dam. This is exactly why most heat cable manufacturers stipulate the tracing height goes at least 6″ higher than the plane of the exterior wall located below. The idea is to create a melted pathway through the origin zone, thus allowing melt water from the roof above an escape path off of the roof.
After the clips have been placed the heat tape can be simply run from one clip to the next. The cable should be set in the roof clip cradles (pinch the cradle down onto the clip to hold it in place).
Standing Seam Metal Roof: Heat Tape Installation

Standing seam metal roofs are regarded as the gold standard in metal roofing. They cost a lot and it lasts a very long time. That said, it’s still not immune from the lowly ice dam. Managing ice dams on metal roofs is an entirely different beast than on a standard composite asphalt shingle due to a couple of factors. First, it’s important to install heat cable clips that respect the integrity of the roof system because repairing a metal roof is exceedingly expensive. For the purpose of this discussion we will break metal roofs into two broad categories: Exposed fastener and Hidden Fastener. Standing seam metal roofs fall into the latter group because, as you may imagine, you can’t see any screws (fasteners) on a standing seam roof.
There are two types of heat tape clips that can be used for standing seam metal roofs: Adhesive based and compression based. Kuhl’s Contracting will determine which of these two clips is most appropriate given the style of standing seam metal roof you have and what your ice dam prevention budget is. Compression-based roof clamps cost considerably more but do have some advantages, including that they can also be used for a snow retention system at the same time as the heat cable is installed. The fact is, you MUST install snow and ice retention in combination with heat tape because the cables will most likely get ripped off the roof by sliding snow and ice otherwise.
Another fundamental difference in the way heat cable is installed on standing seam metal roofs relates to the tracing pattern itself. Notice in the drawing below the heat tape is run in U-shaped patterns that follow up and down each seam, connected by short horizontal runs.
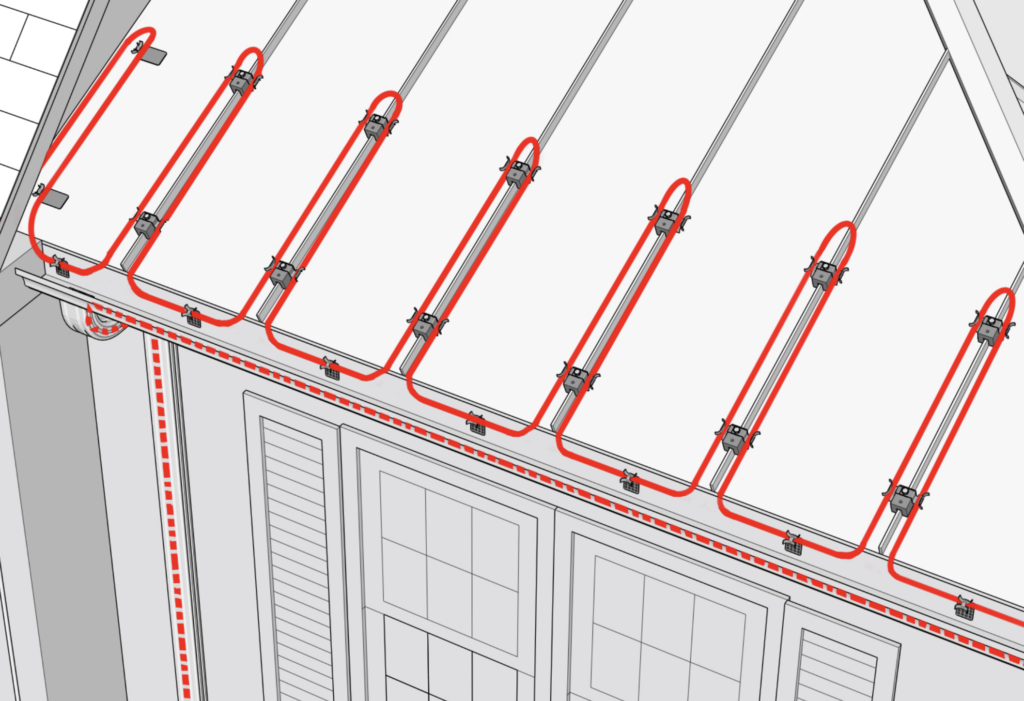
Regardless of the type of heat cable clips we employ, there are a couple of important rules that should be followed when using heat cable on a standing seam metal roof. First, it’s important to protect the cable against damage from sharp edges commonly found on metal roof systems. While the jacketing on self-regulating heat cable provides robust protection against damage in normal operating conditions slicing through it with sharp sheet metal will bring any system to its knees quickly. The next thing to keep in mind is that the cable should never traverse horizontally across the field between the standing seams without a snow and ice restraint system in place above.
Membrane Roofs – EPD and TPO – Heat Tape Installation

For the purpose of this discussion, ‘flat’ roofs will include the two primary membrane systems in North America; EPDM (commonly referred to as ‘rubber’) and TPO (Thermoplastic polyolefin). Regardless of slope, Heat Tape PRO self-regulating heat cable is approved for use on all membrane roofs. Constant wattage heat cable, like EasyHeat and Frost King, are NOT approved for use on any low slope roof, including rubber or TPO. Below is an illustration to demonstrate two methods of installing heat tape on a flat roof with valleys. By ‘Valley’ we mean a depression or swale in a flat or low slope roof that water follows on its journey across the roof. The simplest strategy for installing heat tape on a membrane roof is to study where water travels and then install the cable along those pathways in order to encourage the water to find either a roof drain or scupper (opening on the edge of a roof, normally at the top of a downspout).
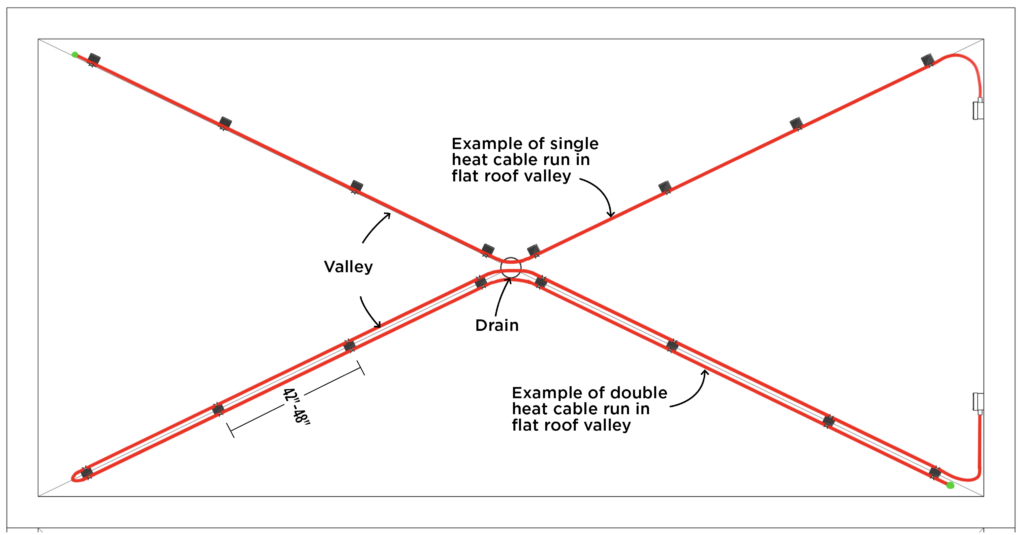
Kuhl uses roof-safe, adhesive-based roof clips to affix the heat cable to membrane roofs. This approach results in zero damage to the roof system while providing sold attachment points for the heat cable system.
One advantage to working with KUHL to install your heat cable is that we are professional roofers. As with all of the other roof systems we install heat tape on, if we identify any problems with your rubber membrane or TPO roof while we are on site, we will fix it upon request. The goal of our work is to keep water out of your property, after all.

Six Ice Dam Warning Signs
Ice dams usually give us a few warning signs before they cause problems on Minneapolis homes. Here is a illustrated guide we created to help you identify the common signs of ice dams in Minneapolis. Six Ice Dam Warning Signs.
Tips on Where Ice Dams Happen: Good Guide to Where Heat Tape Should Be Installed
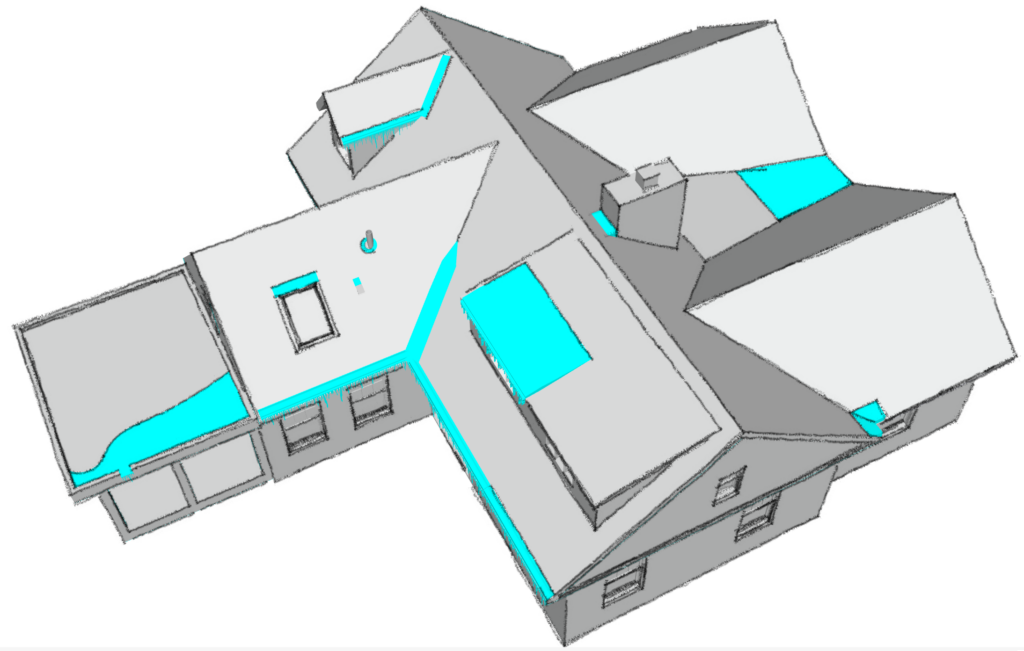
Ice dams happen for specific reasons with every home having a different set of circumstances that contributes to the problem. And yet after having removed literally thousands of ice dams here in the Twin Cities, we have noticed clear similarities, or patterns, in where ice dams are most likely to form on Minneapolis and St. Paul homes. Check out this annotated illustration on Ten Common Ice Dam Locations created by Steve Kuhl for The Ice Dam Company.
Frequently Asked Questions about Heat Tape and Ice Dam Prevention
Q: When should I turn my heat cable system on and off?
A: Generally, you should turn your cable on around the time of the first snowfall. The system can be turned on and off as needed throughout the season.
Q: How hot does HeatTapePro™ heat cable get?
A: Heat Tape PRO will reach 50-80º at its hottest and will not melt or otherwise damage any material it comes into contact with.
Q: What is the warranty and expected lifespan of Heat Tape PRO?
A: HTP carries a 10 year warranty (Raychem has a 2 year warranty). HTP has a minimum expected lifespan of 10 years.
Q: What roofing materials can HeatTapePro™ be used on?
A: HTP can be used on any roofing material, including: Asphalt, Rubber, PVC/TPO, Metal, Synthetic, Wood and Stone.
Q: Do I need an electrician for heat cable installation?
A: A licensed electrician is NOT needed to install a plug-in-ready heat cable or to install heat cable on roofs. Electricians ARE needed to hardwire the cable into a junction box, or run a new circuit if that is a project requirement.
Q: Does self-regulating cable use power when it’s warm outside?
A: Yes. Heat cable will use electricity whenever it is plugged in. We suggest that it is only be plugged in or energized during the snowy cold season.
Q: Why is it called “Self-Regulating” when it doesn’t turn itself off?
A: “Self-Regulating” refers to the fact that the cable regulates it’s own energy consumption along its’ entire length. When it’s colder outside the cable demands more power, when it’s warmer outside, the cable demands less power, making it the most intelligent heat cable system available.
Q: How does self-regulating cable work?
A: There are two main wires embedded in a carbon-infused polymer core. When outdoor temperatures drop, this core contracts slightly, drawing the two main wires closer and increasing the energy passed through the core. The opposite occurs when it’s warmer outside.
Q: Do you need a thermostat or controller with self-regulating heat cable?
A: No. You can leave the cable plugged in during the months when ice dams and gutter ice are most likely. That said, the addition of a controller to turn power on and off completely can add efficiency. Controllers range from simple temperature sensitive, on/off models to systems that sense snow.
Q: Can HeatTapePro™ be left on the roof year-round or does it need to be removed in the summer?
A: Yes. HTP can be left in position year-round. Removal and re-installation increases the likelihood of damage so it is generally not recommended.
Q: How much power does Heat Tape Pro™ consume?
A: The answer depends on cable length and outdoor temperatures. In short, HTP will consume 6 watts per foot at 50º and 9.6 watts per foot at 32º and below. Because it is self-regulating, warmer conditions will use less energy than colder conditions.
Q:Can Heat Tape Pro™ be overlapped during the installation or will it be harmed by overlapping?
A: HTP can be overlapped without any risk of damaging the cable (untrue for Constant Wattage heat cable)
Q: How far up the roof should the heat cable should go?
A: We recommend that the heat cable extend at least 6” beyond the plane of the exterior wall below. Therefore, on a home with 12” eave depths, the cable should run about 18” up the roof.
Q:How is Heat Tape Pro™ self-regulating heat cable attached to metal roofs?
A: There are a variety of attachment methods depending on the style or metal roof you have. You can use our Sticky Clips to attach heat cable to any flat, smooth surface on a metal roof. Otherwise, you can use one of our other metal roof heat cable clips available on our website.
Q: How do I install heat cable if I have gutter guards?
A: In an ideal world you would run the heat cable under the gutter guard, inside the gutter. This is somewhat labor-intensive because removing and reinstalling gutter guard can be a headache. At some point the cable will need to go down a downspout. If you install the cable on top of the leaf guard system, you will have to drill through the leaf guard to pass the cable down through the downspout. This has been done many times successfully but be very careful so as to protect the cable from the sharp edges of the holes you drilled through the leaf guard.
Constant Wattage Heat Cable versus Self-Regulating Heat Cable, A Deeper Look
We get it. It’s tempting to use cheap, constant wattage heat cable to address ice dam or gutter ice issue. Because it’s so affordable, constant wattage cable made by EasyHeat and Frost King account for roughly 90% of the heat cable sold in the United States. The problem is that these systems usually fail quickly based on poor quality materials and unrealistic installation and maintenance requirements issued by the manufacturers. The information below is taken directly from EasyHeat’s manual. Absorb these points because it will make up the backbone of your argument for why self-regulating heat cable is the only rational choice. Very few customers will choose to install constant wattage heat cable if they understand these points.
Constant Wattage Heat Cable (EasyHeat, Frost King, Wrap-On, Etc..)
All of this information is taken directly from the installation manuals for EasyHeat and Frost King and most consumers are completely unaware of any of it.
- One to two year two-year warranty.
- Can not cannot be used on metal roofs, rubber roofs, wood roofs, flat roofs, slate roofs, tile roofs, synthetic roofs or roofs with gutter guards.
- Can’t overlap or touch itself at any point on the installation. If it does, it can burn out, overheat and/or start on fire.
- Combustibles such as leaves and pine needles must be cleared away frequently from constant wattage cables to reduce the risk of fire.
- Can not can not be repaired if damaged.
- Will not work at temperatures below 15 degrees and can make ice dams worse if used below that threshold.
- Can not touch any metal on your roof including valley flashings, gutters, plumbing flashings, and skylights unless that metal is electrically grounded by a licensed electrician.
- The clips that come supplied with constant wattage cable are flimsy and cheap, often pulling loose within a few months of installation.
- Constant wattage asks for the same energy no matter the outdoor temperatures and operate at 100% capacity whenever plugged in.
Heat Tape PRO Self-Regulating Heat Cable
Self-regulating heat cables were originally developed about 50 years ago for use in arctic oil fields to prevent pipelines from freezing. It’s robust technology used mostly for industrial and commercial applications. In the past 25 years, self-regulating heat cables have been adopted for lighter weight jobs such as ice dam and gutter ice management. It has a special conductive core that “asks” for more energy as temperatures decrease. In other words, it “self-regulates.” Here are some benefits to Heat Tape Pro™ self-regulating heat cables:
- 10 year warranty.
- Can overlap itself without risk of shorting out and overheating.
- Effective at temperatures as low as -20 degrees Fahrenheit
- Can be used on any roofing material or slope including metal, rubber, wood, synthetics and flat roofs and, of course, standard asphalt shingles.
- Will not start leaves or pine needles on fire.
- Can safely touch metal objects such as gutters and gutter guards without requirement for electrical grounding.
- Can be repaired in place and can be modified with splices to accommodate any design.
- Adjusts its energy consumption in response to outdoor temperatures, making it much more energy efficient than constant wattage.
- Can be installed quickly using Grip Clips, which eliminates the need to put nail holes through the roof system.
Step By Step Heat Cable Installation Procedures
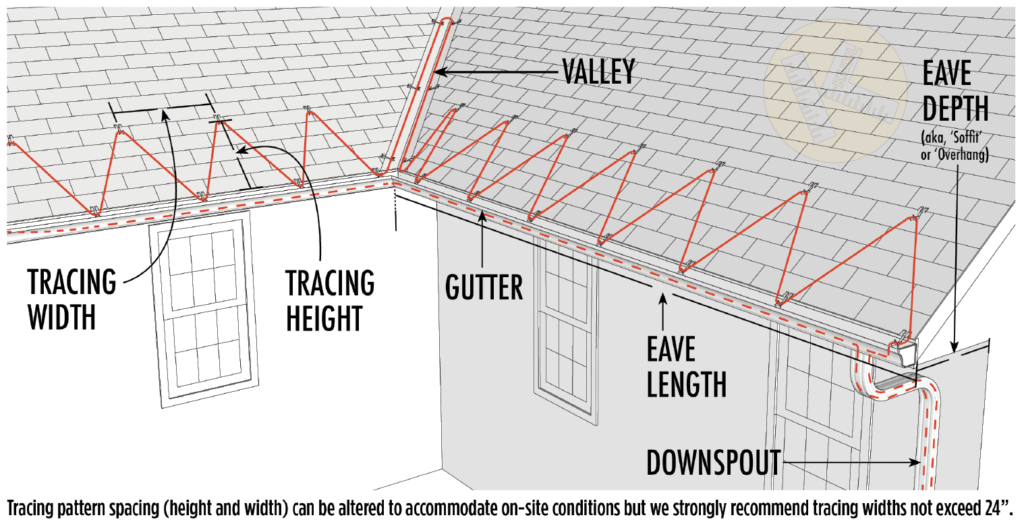
For the initiated souls out there we’ve provided this step by step guide for installing heat tape on your roof. These are procedures our technicians follow, along with a handful of pro-moves that one gains over years of experience.
PREPARE FOR INSTALLATION
- In many cases, you will be removing defective constant wattage heat cable. Do that before you begin installing your new Heat Tape PRO ice dam prevention system.
- Double check your measurements to ensure you have chosen the right cable length and voltage for your application. Think through the best path for your cable pattern, factoring in variables such as downspout and power source locations. Some installers use chalk to mark out clip locations prior to clip installation to ensure proper spacing.
- Before installing HeatTapePro™, make sure the roof, gutters and downspouts are free of debris or any combustibles.
- Check the cable prior to installation for any signs of mechanical damage such as cuts or gouges through the outer jacketing.
- For pre-assembled cables, after uncoiling the cable and before installing it on the roof, plug the cable into a GFCI protected outlet for a few minutes to verify proper operation. Both the illuminated plug and GlowCap™ on the end of the cable should glow, indicating the cable is receiving power. The cable should warm up to the touch within ten minutes. Unplug the cable prior to installation.
INSTALLING HEAT TAPE FOR ICE DAM PREVENTION (See drawings below)
- The top of the serpentine installation pattern (the ‘peaks’ of the cable pattern) should extend at least 6” beyond the intersection of the exterior wall below (Area ‘A’, below)
- Work your way across the eave by weaving the heat cable between your roof clips, which are installed roughly 24” apart from peak to peak (‘D’, below). You may choose to compress that spacing under certain circumstances but keep in mind you may need more cable length to accommodate that change.
- Valleys: Run the cable approximately 6 to 8 feet up valleys. You may choose to run the cable up further on lower sloped valleys.
- On areas without gutters, use Grip Clips™ to create a drip loop. On areas with gutters, you may install a single Grip Clip, point ‘F’, right, or you may use no roof clips on the bottom of the pattern and use a heavy-duty UV resistant cable tie to loosely connect the bottom loop of the cable to the heat cable running along the bottom of the gutter.
- Radiant Solutions Company offers a wide variety of clips for securing heat cable to just about any material. Please consult our list of accessories.
- Gutters: Use a single run of heat cable in gutters that are 5” wide (or smaller) and two runs of cable in gutters 6” or larger. Use either downspout hangers or a CG-24 CableGuard where heat cables drop into downspouts to protect the cable from cuts and abrasions from sharp gutter edges and screws. If a downspout is in the middle of a gutter, loop the cable down and back up. Use CableGuard to protect any areas of exposed heat cable where it exits the downspout. Where the cable enters a buried drain from the gutter system, install the cable along the entire length of the drain you wish to keep flowing in freezing conditions.
- The tracing pattern can be tightened up near the valley (G) to allow for a more consistent clip spacing across the majority of the roof slope. Try to keep the cable spacing consistent to create a visually pleasing outcome. The customer will judge your work in part on how clean it looks so take time to keep things straight and tidy if possible.
Myth versus Reality: Clearing Up Common Confusion About Heat Cable
Myth #1: Heating cables will completely clear the eaves of snow and ice.
Reality: This is false. Heat cables are designed to create a path for melted snow and ice to flow off your roof by forming melted channels through ice and snow. Heat cables, typically arranged in zig-zag patterns along the eaves don’t eliminate all snow and ice around where they are installed. That would be a tremendous waste of electricity.
Myth #2: Heating cables from big box stores are just as good as commercial-grade cables.
Reality: This is false. Commercial-grade heat cables are far superior to the cheaper constant wattage cables found in big box stores like Home Depot and Lowes. While store-bought de-icing cables may seem like a cost-effective solution, they don’t offer the same efficiency, durability, or warranty as self-regulating commercial-grade cables installed by professionals. Though more expensive, the investment in a better-quality product ensures long-term performance and safety.
Myth #4: Heat cables prevent ice dams.
Reality: Yes and No. Heat cables don’t stop all ice from accumulating on your roof; instead, they melt channels through the ice and snow that does accumulate. This allows water to drain from the roof rather than backing up under the shingles and causing damage. Ice dams may still form, but the cables help to minimize their impact by facilitating proper drainage.
Myth #5: Proper insulation, air sealing, and ventilation prevent ice dams.
Reality: Sometimes. Proper insulation, air sealing, and ventilation greatly reduce the likelihood of ice dams, but they don’t guarantee complete prevention. Certain factors like sun exposure, roof architecture, and specific homeowner behaviors can still contribute to ice dam formation even when your attic is correctly insulated and ventilated.
Myth #6: Heat cable can cause fires
Reality: True, if you by cheap, constant wattage heat cables like EasyHeat and Frost King. When you read the installation manuals for constant wattage cables you will see that those cables are not supposed to overlap or touch themselves (at risk of starting on fire). Those cables are also not supposed to touch anything combustible, such as leaves, pine needles or wood on your home.
Areas Served: You may notice that most of our roof de-icing systems are installed all over the greater Minneapolis – St. Paul metro area. We work as far north as White Bear Lake, as far east as Sun Fish Lake, South to Prior Lake, and slight past Lake Minnetonka. If the project is large enough me may consider traveling further assuming our schedule allows. Other cities we serve include: Orono, Excelsior, Plymouth, Golden Valley, St. Louis Park, Edina, Bloomington, Burnsville, Lakeville, North Oaks, Plymouth, Minnetonka Beach, Wayzata, Eden Prairie, Long Lake, Mound, Chanhassen, and Minnetonka.

