Ice Dam Prevention in Minneapolis and St. Paul
Ice dam prevention is a bit of a misnomer. Technically, it’s almost impossible to fully prevent ice dams if the conditions are right. Those conditions are: lots of snow, temperatures fluctuating between 10-20 degrees, inadequate insulation and ventilation and air leaks. Let’s not forget about air leaks.
We are in fact the only company in Minnesota that regularly tackles ice dam prevention from both the inside and the outside of homes. Kuhl Case Study #21 looks at a typical approach to solving ice dams on an Edina home from the inside. Simply put, that type of ice dam prevention project involves removing interior finishes (such as drywall or plaster), removing the insulation and replacing it with high R-value spray foam insulation from the inside. That work is finished with the installation of new drywall and repainting. One advantage to this approach to ice dam prevention in Minnesota is that it can be done year-round. Spray foam insulation in Minneapolis requires temperatures of at least 40 degrees to cure properly. Doing the work from the inside allows this to happen, even in the middle of winter.
There are other situations where it makes more sense to attack the ice dam problem from the outside of the home. Here is a list of conditions under which ice dam prevention is best addressed from the outside:
- The interior finishes are too expensive or complicated to remove and replace.
- Removal of the interior finishes will not allow for complete access to the problem areas.
- The client wants to avoid the mess and hassle of interior work.
- The roof system is in need of replacement (if the roof needs replacing anyway, it makes sense to add insulation from the outside because it is a more cost effective and less invasive approach to ice dam prevention).
- The roof system needs major modifications to the ventilation components (soffit vents, clogged air chutes and box vents can not be addressed from the inside of the home).
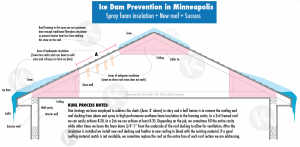
Some homes with ice dams in Minneapolis have terrible insulation from top to bottom while others only have a few ‘weak’ spots. Still, even a couple of weak areas can have catastrophic effects in the form of big, bad ice dams. If you study the ice dam prevention diagram above you will see that on some roofs, the weak spot happens in the middle of the roof. The area below the knee wall often has plenty of space for insulation and ventilation, as does the area above the collar ties. Incidentally, the collar ties are the framing members the define the ceiling of the standard story and a half ceiling. The problem area occurs in the area between knee walls and the collar ties, where there is only either 2×4 or 2×6 roof framing to accommodate the insulation system. Given that almost all homes with this sort of roof framing are were built before 1960, the insulation installed in those roofs is likely either rock wool or standard fiberglass batts. The net result is very little R-value standing between the cozy interior and the frigid exterior. That’s where high-performance spray foam comes into play. We can pack in 2-3 times the R-value in the same space using spray foam instead of fiberglass. Plus, spray foam acts as an air sealer as well, keeping dreaded hot air leaks from reaching and heating the roof deck. Here are some photos of a recent project we completed in Minneapolis using spray foam insulation to address chronic ice dams.
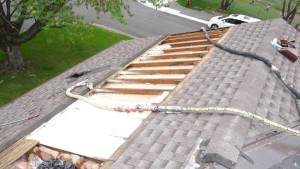
The first step in the process to prevent ice dams (or greatly reduce the likelihood they will occur) is to peel back the roofing over the area between the knee wall and the collar ties. This exposes the fiberglass insulation, which can then easily be removed. This photo also demonstrates another very common issue; lack of ventilation. You can see that there is no room above the fiberglass batts to allow air to flow from the soffits to the box vents on the top side of the system. When we install spray foam in cavities like this, we often leave about a 3/4″ to allow for ventilation. The exception to this rule is when we create what is called a ‘hot roof’. That topic will be covered in a future blog.
The next step in the ice dam prevention process is to strip spray in high performance closed cell urethane insulation. The key here is to spray on top of the existing knee wall and collar tie lines. Again, it often makes sense to leave a small air-space on top of the new foam insulation to enable a ventilation pathway from the soffits up through the ridge of the roof.
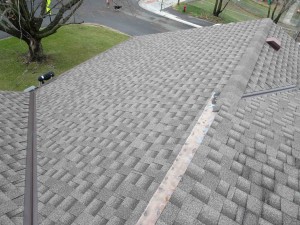
The final step in this approach to ice dam prevention via spray foam insulation is the most simple. Find the matching roof material and install it professionally. Can you see the lines between old and new? When matching materials are not available the only option is to replace the enter affected roof pitch. One advantage to this approach is that we are able to install more ice and water membrane that what was originally installed (usually just enough to meet building code and nothing more).
When it comes to preventing ice dams in Minnesota, no one does more of this sort of work that we do. It takes a bit of forensic analysis up front to figure out the best solution to the problem. In some cases, such as the Edina home shown here, the best solution to solving ice dams is to remove the roofing and address the issue from above.


