News & Articles
Faulty Flashing Above Lake Harriet Bay Window
April 14th, 2017
by Aaron Fruit
The Addition of Flashing to the Edge of This Roof Saved This Lake Harriet Homeowner Serious Money
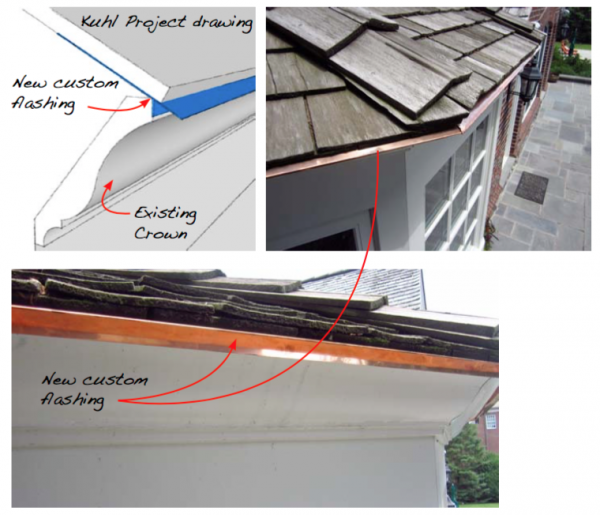
The original builder of this beautiful home near Lake Harriet in Minneapolis spared no expense when it came to quality in design and materials. But nobody is perfect. The original roofer installed the cedar shingles with an inadequate drip, or overhang, from the large crown moulding on the top of this bay window (A).
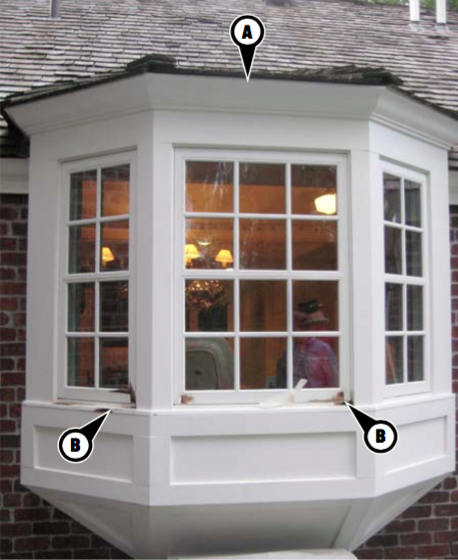
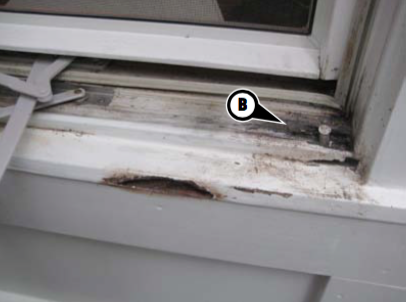
As a result, water quietly leaked behind the crown and into the wall of the bay window, causing a fair amount of rot and damage to the wood casement windows (B).
Our client had received one opinion from the original builder to x the issue. Because the home was 12 years old the x was not covered under any warranties and it wasn’t going to be cheap. His idea was to replace the cedar roof, crown moulding, windows and surrounding trim. Cost: $5355.00.
Ouch.
In our opinion there was a smarter (and cheaper) way to fix this area that would last many, many years. First, to solve the issues related to the inadequate cedar roof projection we simply fabricated and installed a custom ashing under the first course of roofing and tar paper. Pow! Next, we dug out all of the soft wood and used an epoxy wood hardener to stabilize all of the areas affected by the water over time. Finally, we filled all the damaged areas with a two-part epoxy putty. After sanding it all down and painting, the place looked like new. It still does three years later.
Posted in Uncategorized
Leaking Stucco Chimney Solution
March 31st, 2017
by Aaron Fruit
Stucco Home in Eden Prairie Has Damage That Needed Fixing
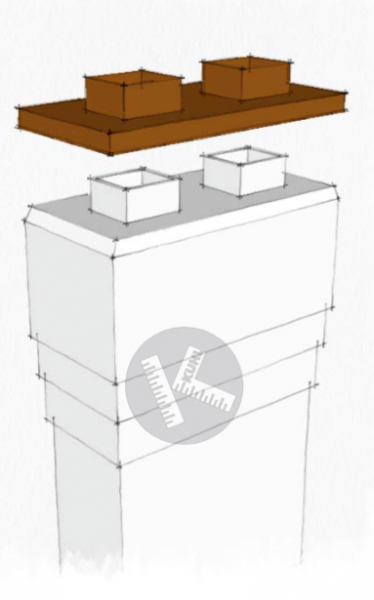
The Problem: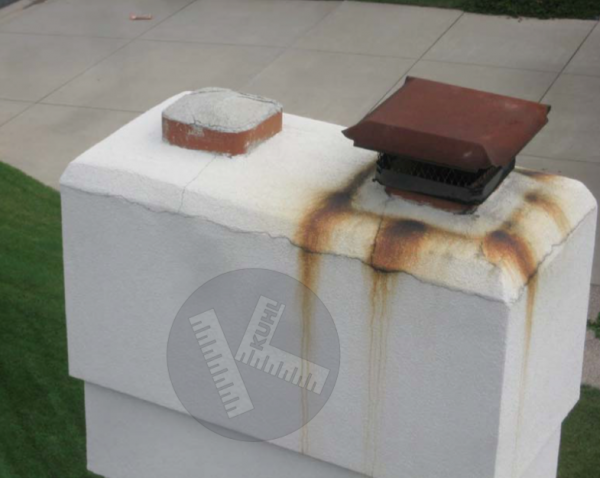 A leaking stucco chimney. The cap of the original chimney had a sloped mortar core with a top coat of stucco (portland cement). Bad idea. We don’t like stucco to be used on horizontal surfaces unless particular steps are taken. Water was leaking down into the chimney column and causing trouble below. Instead of rebuilding the upper portion of the chimney (big bucks) we advised our client to cover the existing cap with a custom copper chimney cap.
The Solution: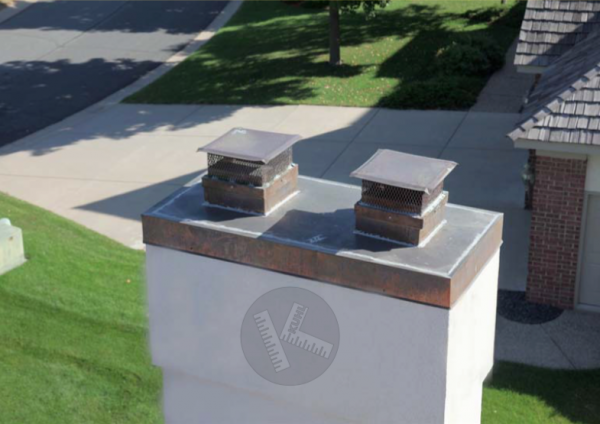 Many Kuhl solutions, such as this one, are based on a rendering produced specifically for each job. We would rather work out the details on the laptop than at your home as the work is underway. Plus, renderings allow us to have a conversation about design possibilites before any work begins. The copper chimney cap we built for this home cost roughly $1,200 to fabricate and install. It is a superior quality finished product that will stand the test of time and changing of seasons. What leaking stucco chimney?
Posted in Uncategorized
What Does Hail Damage Look Like, Part One
March 17th, 2017
by Aaron Fruit
Minneapolis hail storms leaves clear evidence behind
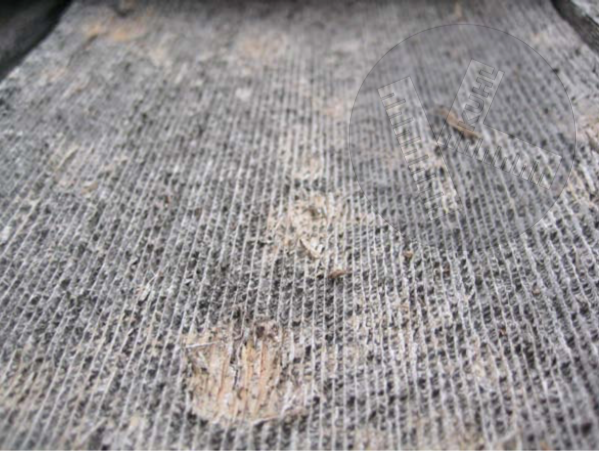
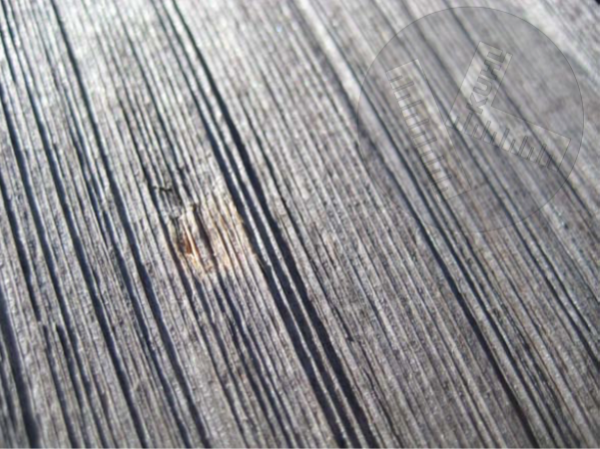 This is an impact mark from a .75” hail stone on a 3 year old medium hand-split cedar shake roof in Edina, Minnesota. Such hail frequently causes severe damage to cedar shake and shingle roofs. In this case the wood was resilient enough to escape with only a minor ding. Neighbors all around this home had their roofs replaced from the same hail storm. This roof sustained only cosmetic damage.
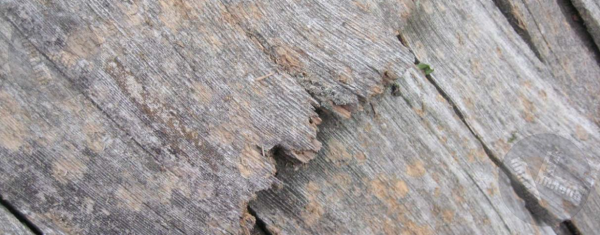
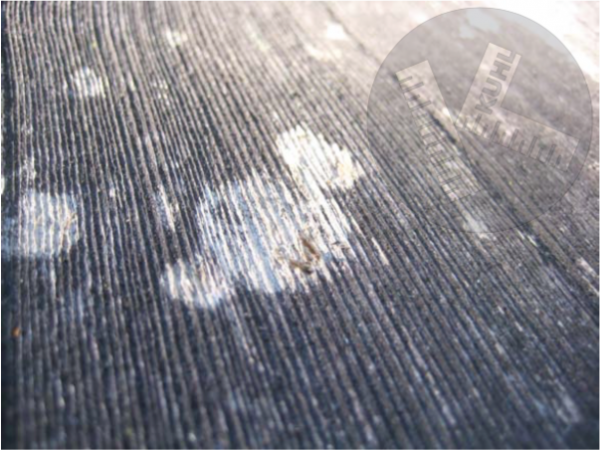 Here we see a 13 year old hand-split heavy cedar shake roof with heavy black mold and oxcidation. The direction of the hail storm resulted in glancing blows rather than perpendicular strikes. The discoloration on the surface of the cedar shake has been removed by the impact of the hail stone but no functional damaged was done that will affect the integrity of the shake.
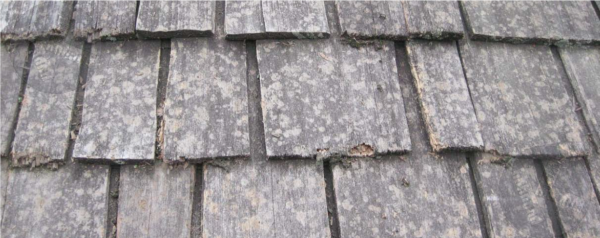
 Hail storms in Minneapolis are all quite unique and localized. One neighborhood can be hit hard while the next one over barely gets hit at all. Pictured here is a 15 year old cedar shake roof in Plymouth, Minnesota after a severe hail storm. Not only was the hail .75” in diameter, it was very concentrated. While this particular cedar shake is more or less new many repairs were needed on this roof in other areas.
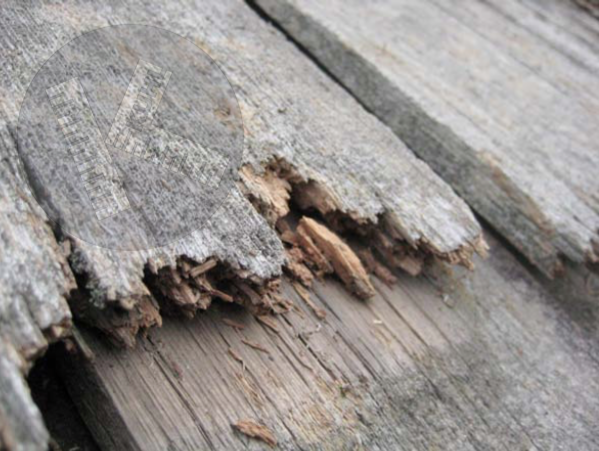 This cedar roof was 22 years old and was victim of a hail storm that went through Maple Grove a few years ago. The entire roof was littered with debris from the storm. There are a few interesting things to note: First notice how the cedar that was exposed as the result of the hail damage looks ‘fresh’, with orange coloring while the surrounding material is grey and weathered. Next, the hail damage is most severe on the butt edges of the shakes.
Posted in Uncategorized
What Does Hail Damage Look Like, Part Two
March 10th, 2017
by Aaron Fruit
Minneapolis Hail Storms Leaves Clear Evidence Behind
 3/4” to 1” hail really whacked this poor roof on Lake of the Isles in Minneapolis. The material was 22 years old and was somewhat brittle prior to the hail storm. This enhanced the affect of every hail stone impact by allowing deeper penetration. Even if this roof were 5 years old at the time of this event it would have hail damage. The reason being that it is less brittle at 5 years old than 22 years old. The damage seen on older cedar shake roofs, such as this one, are in direct proportion to the degree of existing embrittlement. For example, it was relatively easy to roll my thumb off the bottom edge of these shakes and produce 1/2” to 1” of crumbled cedar dust. Our clients had this roof insured through Chubb, which I have found to be the most generous and fair insurance companies to deal with in storm damage cases.
 This is the same cedar shake roof on Lake of the Isles, Minneapolis. It’s common to see different hail damage from one roof slope to the next. There are two reasons for this. The first reason is that hail storms normally throw hail from a dominant direction and the force of the hail impact is increased as the strike angle becomes more perpendicular (as opposed to glancing strikes). All of the south facing slopes can be trashed while the north facing areas are barely affected, for example. The second reason is that the orientation of a roof will affect how the wood ages significantly. Northern slopes tend to maintain hardness and integrity longer than south-facing slopes. Other factors such as tree coverage, roof pitch (steepness) and maintenance history factor in as well.
Posted in Uncategorized
Minneapolis Gutter and Roof Cleaning
February 27th, 2017
by Aaron Fruit
No matter how long winter is, spring is sure to come. And if you’ve been around the Twin Cities last week, it feels like it’s already here. It’s hard to imagine it’s still February, but it’s never too early to start thinking about your home maintenance needs.
If you live in Minneapolis, we want to make sure roof and gutter cleaning are on your list this year. If it isn’t, we’re here to tell you it should be! During the winter months, harsh weather affects the integrity of the health of your home. Ice, snow and dramatic temperature shifts can all wreak havoc on a roof. Even if you don’t suspect any problems or issues, it is best to scope it out just to be certain.
Many Minneapolis homeowners forget about their home exteriors over the winter months so we thought we would put a simple checklist together to help with the broad strokes.
Minneapolis Roof and Gutter Maintenance Checklist
-
Safety first
- Walk around and inspect from the ground level first
- Ladder safety: Be very careful on ladders
- Roof safety: Under most circumstances we do not recommend homeowners climbing their roofs. It’s best to hire a pro
-
Clear off big debris
- Use a bristle broom or leaf blower
-
Cleaning gutters
- Hands-in for big debris
- Hose for small stuff after. A hose rinse before cleaning big debris can clog the downspout
- No pressure washers as these machines can damage the gutters
Dealing with these budding problems in a sensible timeline will help your roof withstand the spring rain, hot summer sun, and any additional challenges that come with the changing of the seasons. If you determine you need a professional for roof cleaning or need roof repairs, call on Kuhl’s Contracting to do the job.
Posted in Uncategorized
Ice Dam Puzzle
February 24th, 2017
by Aaron Fruit
Minneapolis Homeowner Struggled to Find Educated Perspective on Ice Dam Mystery
The Problem:
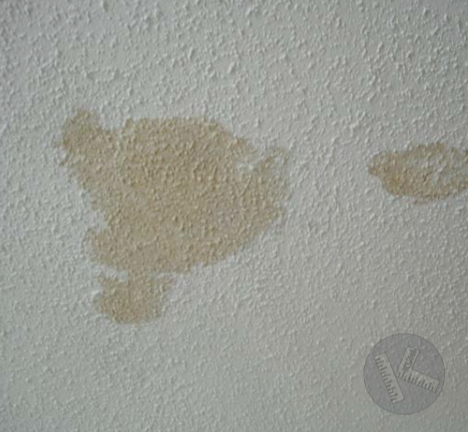
Our client had been plagued by ice dams and cold-room-syndrome for many years. Ice dams are a roof problem, so why not call a roofer? The fact is, ice dams are not a roof problem and while one can limit the damage done by ice dams through intelligent roof design and installation, ice dams are a part of a bigger system involving the way heat and air move through a home. Simply replacing this roof would not prevent ice dams from happening in the future. Need a problem solved right? Call Kuhl.
The Solution:
The solution to just about any problem involves first understanding the underlying causes. Ice dams are the result of a complex interaction of many things including architecture, climate and lifestyle. To put a finer point on it, ice dams are related to how heat escapes from the areas it belongs to areas it is not supposed to be. That heat causes snow melt on your roof, and the saga begins.
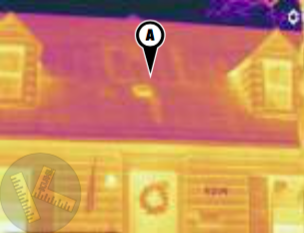
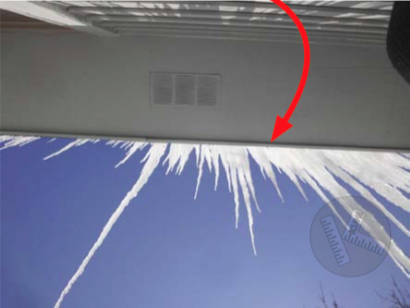
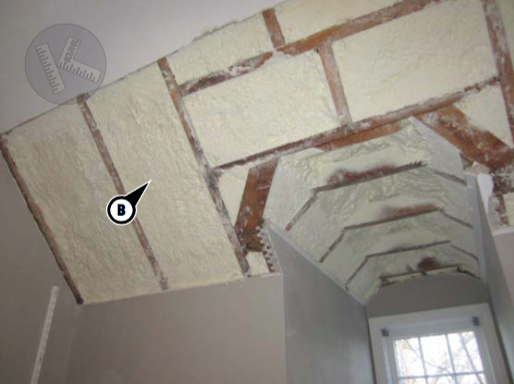
We used our thermal imager to study the heat loss in this home (A). The result was clear: we needed high performance insulation and it had to be in a small cavity. That’s a perfect time for spray foam insulation (B). At R 6.8 per inch, it packs a real punch in a small area. We removed the plaster and sprayed foam insulation in the exposed roof areas to create a hot roof (a roof that needs no ventilation). After insulating the knee wall spaces and replacing the roof area above with a full treatment of ice and water shield, we installed new plaster and repainted.
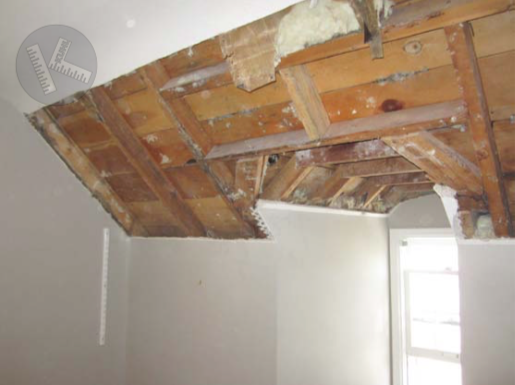
The result was clear: we needed high performance insulation and it had to be in a small cavity. That’s a perfect time for spray foam insulation (B).
There are few companies in Minnesota that can diagnose and resolve small, multi-trade home improvement projects with the efficiency and cost effectiveness of Kuhl. Not to brag, but we are pretty awesome.
Posted in Uncategorized
Solve the Mystery Leak
February 10th, 2017
by Aaron Fruit
A Leaking Home Gets Fixed for Good
The Backstory:
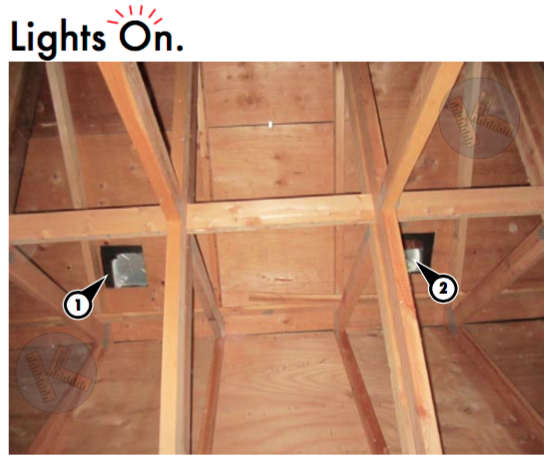
Our clients, homeowners in Eden Prairie, had a mysterious water spot on the ceiling of their dining room. It clearly was related to rain because there was no plumbing in the vicinity and the damage appeared after one of those long, soaking storms. Their original builder offered to come out and take a look and he found what he thought was the problem in a few minutes, that the leak was originating around one of two roof vents near the peak of the roof (1 and 2 in below photo). We were asked to render our opinion the next day. The problem was easy to find and it had nothing to do with the vents.
The builder made a common mistake: he flipped the lights on in the attic so he could do the best inspection possible. Seems logical enough. But we have learned it is always smart to take some time in the dark up there to see things otherwise hidden. In this case, the hidden thing was a small hole chewed in the roof between the two vents (f’ing squirrels!). A visual inspection of the roof confirmed this assessment. Dork alert: We took this excellent photo of the hole by holding our camera against a framing member on leaving the shutter open for a long exposure. Not that we are geeks about this sort of thing. But seriously, how cool is that photo?
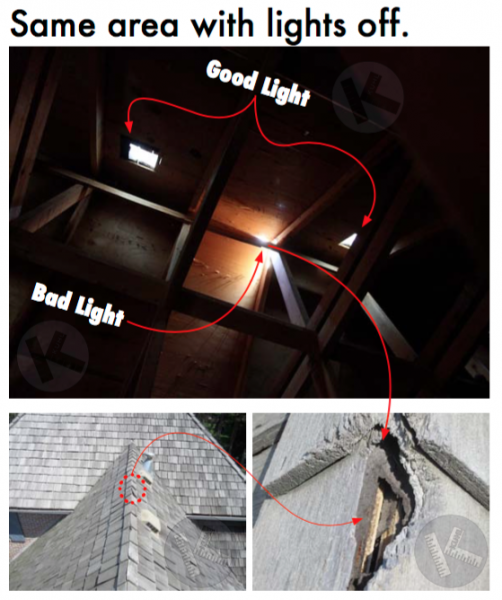
The Solution:
The solution was a rather cheap repair to the ridge of this medium hand-split cedar shake roof. Now, keeping the squirrels off the roof is another matter altogether.
Posted in Uncategorized
But I just need my roof washed…
January 27th, 2017
by Aaron Fruit
Cedar Roof Cleaning Expert Rescues Excelsior Homeowner from Other ‘Expert’
The Backstory:
Upon the advice of her realtor, our client hired a roof washing franchise to wash her cedar shake roof. She was about to put her house on the market and a moss-free roof would be a nice touch. The company she hired specialized in cedar roof cleaning so it was a perfect match. Problem is, because these guys earn all their money washing roofs, they tend to think every roof is worth washing. And while they were 85% correct in this case, the 15% that wasn’t worth washing got ugly, quick (See below image: 1). The moment these guys started washing they must have realized the error of their ways so they did their best to take off the biggest chunks of moss while not trashing the roof. The outcome was not pretty.
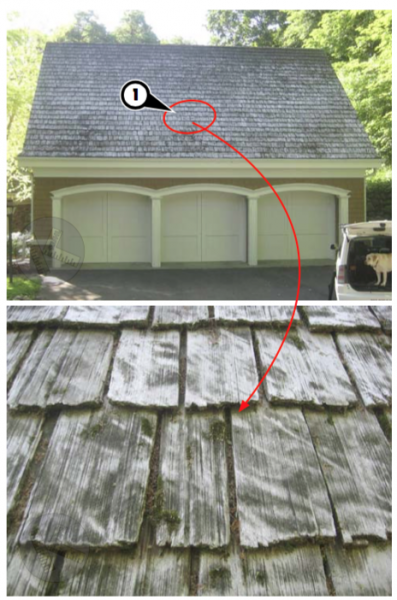
She fired them shortly after they wrecked the garage roof. Her builder suggested using Kuhl as a resource to wash (hopefully) the rest of her roof and fix the cedar roof on the garage.
The Outcome:
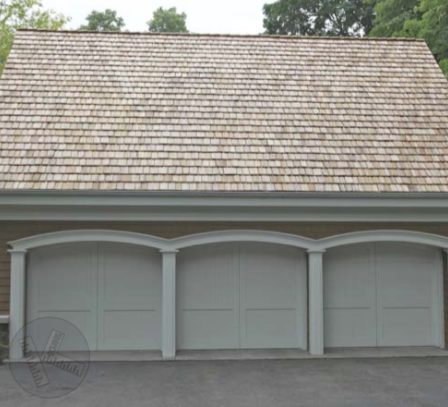
Our professional, on-staff roofers replaced the garage before we washed, repaired and preserved the remaining roof areas.
We replaced the garage roof with a hand-split shake to match the remaining roof. We then used a larger orifice tip in our washers to reduce the pressure delivered onto the remaining roof areas. Adjusting pressure and volume settings is something we do frequently to accommodate every roof, because they are all different. We also tell clients when washing some or all of their cedar roof is a bad idea, regardless of the impact on our bottom line. In the long run it’s really smart business.
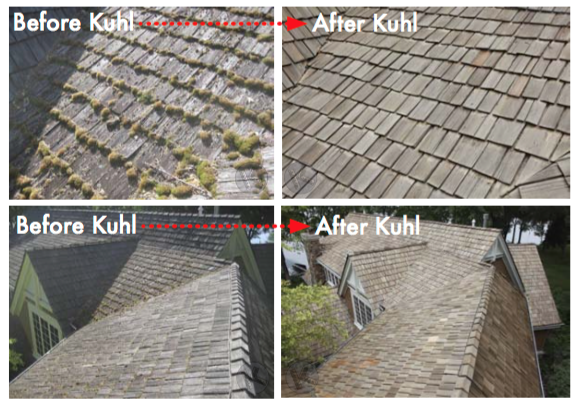
Before and after cedar roof cleaning, repairing and preservation. This roof was 17 years old.
Posted in Uncategorized
Classic Flashing Failure
January 20th, 2017
by Aaron Fruit
A Leaking Home Gets Fixed for Good
The Problem:
We’ve seen this over and over on Twin Cities’ homes, in particular homes built in the last 30 years in Eden Prairie, Minnetonka, Edina, Plymouth, Wayzata, and Bloomington. A bottleneck created by the intersection of the garage roof and the wall of the home. The result is a pinch point where water frequently leaks into the walls below. Normally this type of leak takes years to manifest inside the home, resulting in a fair amount of interior repair work once it is discovered. Bummer.
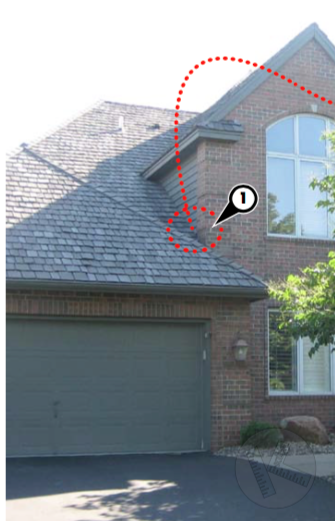
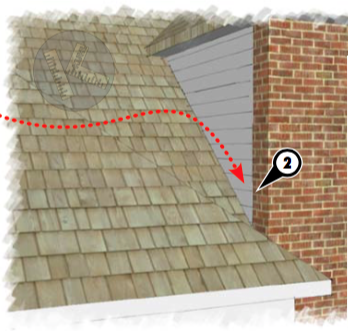
- Common trouble spot. In concept, this detail is okay but it is seldom executed well. Whether you blame it on the architect or the builder, someone didn’t spend enough time thinking about water when this area was conceived.
- Project rendering of area before work began. The challenge was not to turn this into a major project because it involved roofing, siding, sheet metal and masonry.
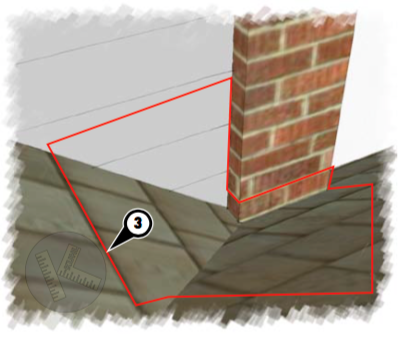
- We removed the area indicated by the red outline.
This is a common problem found on many homes regardless of the siding type. In this case, the brick veneer only amplified the issue by trapping water and debris efficiently with each rain. The leak damaged drywall and insulation inside the home.
The Solution:
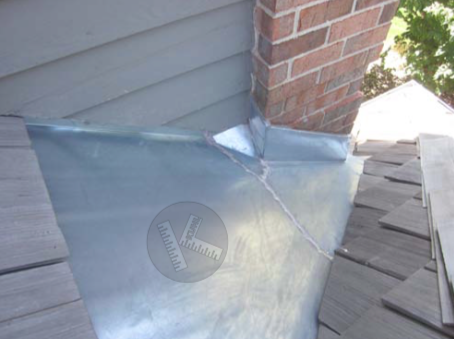
We removed the cedar lap siding and shake roofing so we could expose and repair the rotten roof decking. After wrapping high-temperature ice and water membrane from the roof up the walls we then installed a hand-soldered galvanized steel pan, a bomb-proof solution to a problem two other companies had tried to address over the past ten years. The new metal was ground into the brickwork and counter flashed for total awesomeness (Industry term).
This is one of those troublesome small projects that no one wants to touch. An expert solution involves at least five trades and pays each one very little for their contribution. It falls into the ‘not worth the trip’ category for a lot of contractors as a result.
We happen to employ masons, carpenters, roofers and sheet metal guys so a project like this is right up our alley. Plus, when we kick ass on a small job like this people tend to recommend us to others. That makes us happy.
Posted in Uncategorized
Leaf Guard, Gutter Guard, Gutter Helmet
January 6th, 2017
by Aaron Fruit
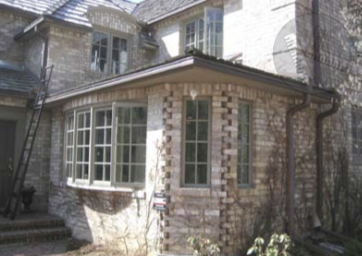
Gutter Contractor Installed $32,000 of Worthless Copper Gutters… Then Laughed All The Way To The Bank
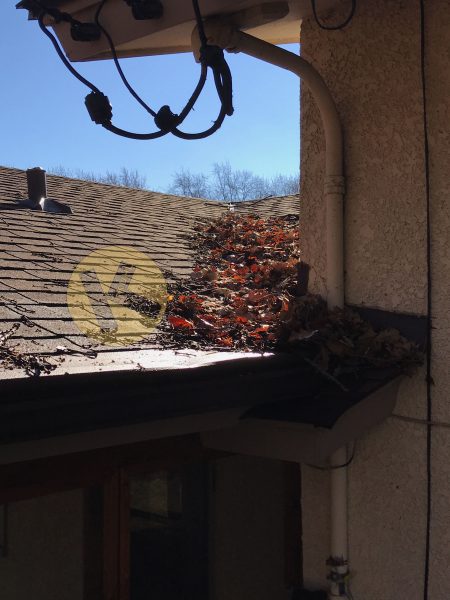
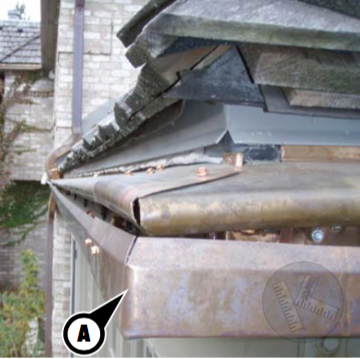
The Problem:
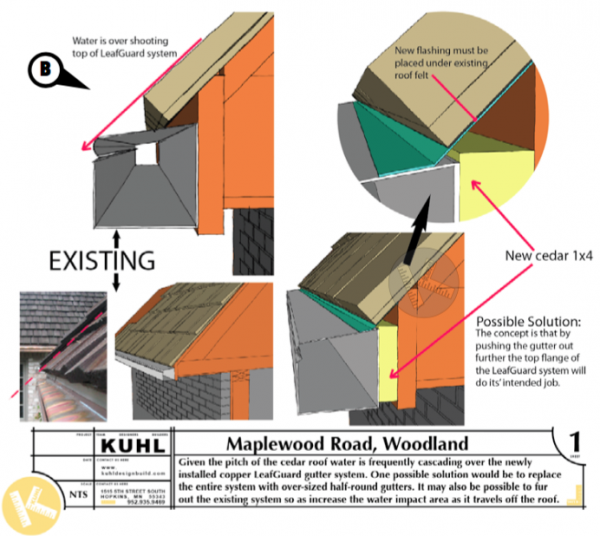
Our client had gone ten rounds with the company that installed this gutter debris management system (A). Next stop, lawyers and courts. They decided to cut their losses and hire Kuhl to replace all of their gutters. The first step in resolving problems with an existing system is to understand the nature of the problem. Here is how we explain things to clients (B).
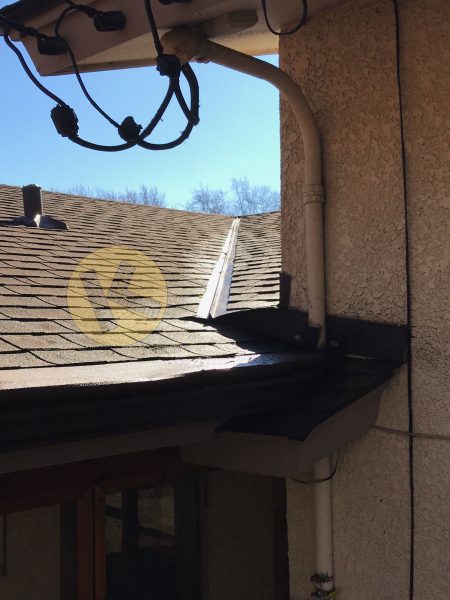
The Solution:
We installed 6” half-round copper gutters on the entire home after ripping off the system that was in place. Our gutter system was conceived carefully to achieve three goals:
- Capture water running off the roof.
- Last a long, long time.
- Look great.
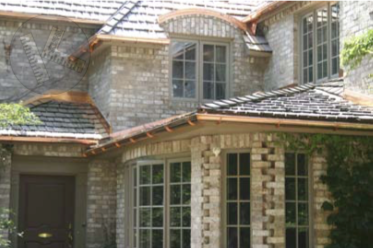
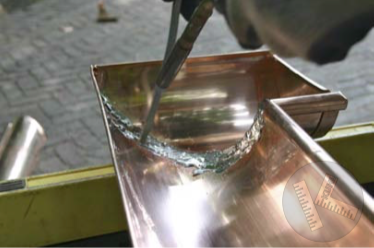
We work with a variety of materials and products because we don’t like being married to one method. The company that installed the original system on this home sold one system and simply could not resist the temptation of a huge job, even though their system was not correct for this home.
Posted in Uncategorized