Kuhl’s Contracting is the largest installer of ice dam prevention heat tape systems in Minnesota. Our crews travel the country installing the stuff, so if you happen to life near the Twin Cities, you’re in luck! We install the Heat Tape PRO™ Ice Dam Prevention System, the world’s most advanced self-regulating heat cable paired with a line of patented, roof-safe roof clips and accessories that keep your home safe and free of ice dams.
10-Year Warranty
The Heat Tape PRO ice dam prevention system has the longest warranty in the industry, five times longer than cheap, hardware store brands like EasyHeat and Frost King.
Experience – No One Installs More Heat Tape in Minnesota!
We are experts in the field of ice dam and gutter ice mitigation. When we visit your home you will understand this quickly. The KUHL family of companies includes The Ice Dam Company (the largest and oldest ice dam removal business in the United States) and Kuhl Design + Build (An award winning residential construction company established in 1999). Why does this matter? Because our understanding of your ice dam issue is based on a vast amount of experience and our heat cable installation techs are pros. We work on any roof system, at any height with any gutter and drain system attached.
Heat Cable Installation Cost – Minneapolis & St. Paul
We get it. You’ve probably never had heat tape installed before, and if you have it wasn’t a commercial-grade, bad ass system (That’s why you’re reading this). 50% of our roof de-icing heat cable system installations involve tearing out old, cheap EasyHeat or Frost King heat cables. It’s better to put in a real system the first time.
So, what does a professionally installed heat tape system cost? In short, it depends on a few key factors, including:
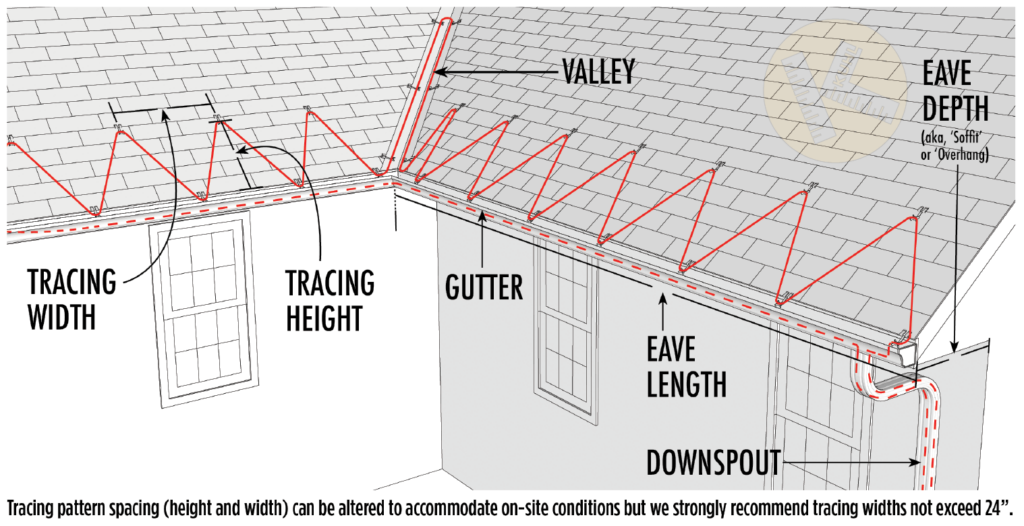
Heat Cable Footage: We install systems as short as 30′ into thousands of feet in the case of our commercial projects. We charge by the running foot of cable, normally somewhere between $12 and $17 per foot of cable. Calculating the cost to use heat cable in gutters alone is quite simple (just measure the gutter and downspout sections and multiple by $12-$17). Most of our ice dam prevention projects involve installing a zig-zag (or ‘serpentine’) cable pattern along the eaves, which means each running foot of eave requires more than one foot of cable. See the Heat Cable System Glossary of Terms, below, for a better understanding of what we’re talking about.
Site Considerations: Factors like site access and the height of the area where we are installing heat tape are also cost drives in our estimates. Simple one-story jobs are easier than four story beasts.
Cable Type: Yes. It’s true. Our cable systems cost more per foot than the disposable type you can buy at Home Depot or Lowes (EasyHeat and Frost King). But you get what you pay for and if you care to geek out and understand some of the differences, see the section below titled “The Difference Between Constant Wattage and Self-Regulating Heat Cable”. Most people who bother to learn about the difference would never install the cheap stuff.
Average cost of complete ice dam prevention heat tape system in Minnesota: Because we benefit from doing hundreds of these systems over 30 years, we have a pretty good sense for average price ranges. The typical cost for our systems ranges between $800 and $2800. That’s a broad range, we know. But in the course of a short conversation with one of our experts on the phone we can probably get a tighter range.
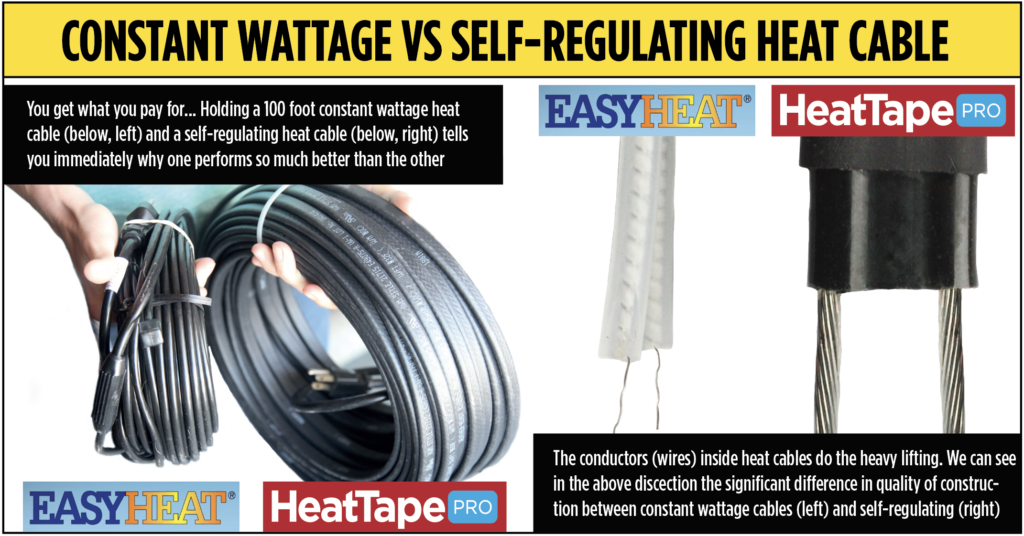
The Difference Between Constant Wattage Heat Cable and Self-Regulating Heat Cable
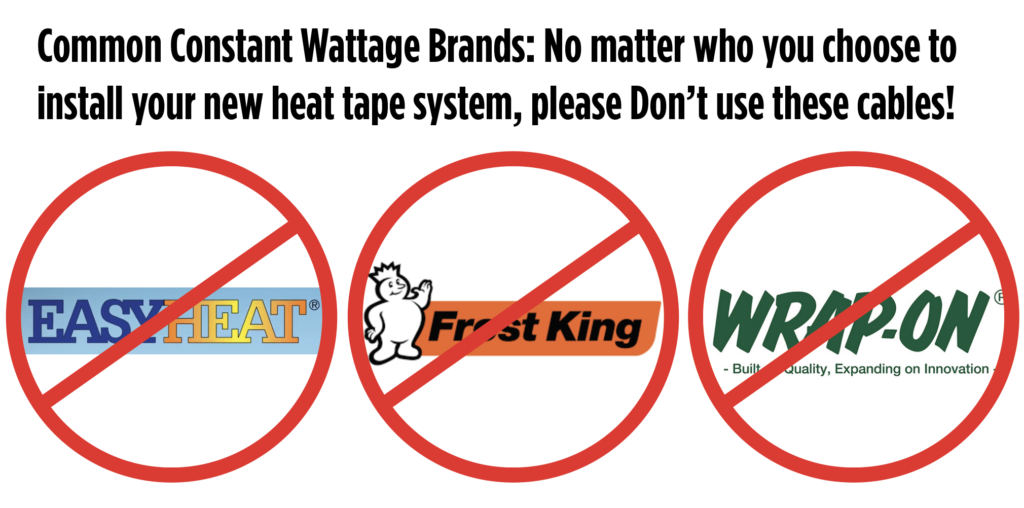
Many homeowners turn to big-box stores for heat tape to prevent ice dams, but most of these products are constant wattage heat cables. What does “constant wattage” mean? It means the heat tape operates at full power continuously. Once plugged in, it’s always running at maximum capacity, leading to high energy consumption. Over the course of a winter season, these energy costs can add up quickly. If you thought you were saving money by opting for cheap heat tape from your local home improvement store, think again. The higher operating costs, combined with reduced energy efficiency, can ultimately result in spending far more than anticipated. For more efficient and cost-effective ice dam prevention, consider self-regulating heat cables, which adjust their power output based on the surrounding temperature—saving you energy and reducing costs. Here are some other important differences between constant wattage heat cable and self-regulating heat cable (All of this information is taken directly from the installation manuals for EasyHeat and Frost King)
Heat Tape PRO™ Self-Regulating Heat Cable
Constant Wattage Heat Cable
Ten year warranty
One to two year two-year warranty
Can be used on ANY roofing material including asphalt composite shingles, rubber membrane, TPO, wood, tile, slate, torch down and more
Can not cannot be used on metal roofs, rubber roofs, wood roofs, flat roofs, slate roofs, tile roofs, synthetic roofs or roofs with gutter guards
Can overlap itself without risk of shorting out and overheating.
Can’t overlap or touch itself at any point on the installation. If it does, it can burn out, overheat and/or start on fire
Will not start leaves or pine needles on fire. There’s not need to ‘maintain’ the system by removing leaves from around the cable each year
Combustibles such as leaves and pine needles to be cleared away frequently from constant wattage cables to reduce the risk of fire
Can be repaired in place and can be modified with splices to accommodate any design
Can not can not be repaired if damaged. One little bit of damage and the cable is trashed
Effective at temperatures as low as -20 degrees Fahrenheit
Will not work at temperatures below 15 degrees and can make ice dams worse if used below that threshold
Can safely touch metal objects such as gutters and gutter guards without requirement for electrical grounding
Can not touch any metal on your roof including valley flashings, gutters, plumbing flashings, and skylights unless that metal is electrically grounded by a licensed electrician
Can be installed quickly using Grip Clips, which eliminates the need to put nail holes through the roof system
The clips that come supplied with constant wattage cable are flimsy and cheap, often pulling loose within a few months of installation
Adjusts its energy consumption in response to outdoor temperatures, making it much more energy efficient than constant wattage
Constant wattage asks for the same energy no matter the outdoor temperatures and operate at 100% capacity whenever plugged in
Our first unfortunate taste of winter in Minneapolis came a couple weeks ago with the unexpected (and unwanted) snowflakes on October 11th. It was a good reminder that you know what is coming. Soon. A little effort invested before the landscape turns white will yield worthwhile benefits in energy costs, comfort and peace of mind.
Here’s a handy pre-winter checklist to help identify and fix issues on the exterior of your home before old man winter visits.
Check Weather Seals, Weather Stripping and Door Gaskets
If you feel a draft coming in under your exterior doors, there are two simple things to check. First, how tight is the door sitting against the weather stripping where the door meets the door frame? If obvious gaps are present weather stripping is available at hardware stores and it’s relatively simple to install. The second thing to look at is the threshold. If it is adjustable, use a screw driver to raise it up so that it contacts the door sweep. If it is not adjustable, you can purchase a retrofit door sweep that attaches to the inside of the door to keep drafts from coming in under the door.
Seal Windows
Check to make sure all of your windows are closed and locked. Failing to engage the locks (if you have them) can increase unwanted air leaks by 30%. Next, consider applying window film to windows that are hopelessly drafty. Such film kits can be purchased at just about any hardware store and applied on either the inside or outside of the window. Ultimately, it is ideal to replace drafty windows but window film can work wonders for you between now and then.
Install Heat Tape Where Needed Remember the terrible ice dams from last winter? We do, because many of you paid our sister company The Ice Dam Company to remove them with steam. It is admittedly expensive work and not the way anyone wants to spend their hard-earned cash. If you find yourself without the budget to re-insulate, heat tape is a good option. Be absolutely certain to use the correct type, however, as the cheap, constant wattage heat cable available at hardware stores is worse than installing nothing at all. Instead, use a high-quality, self-regulating heat cable such as Heat Tape Pro, by Radiant Solutions Company. There are ‘professionals’ in our area installing constant wattage heat cable, so always ask about what is being installed when receiving estimates to avoid wasting your money.
Shut Off Outdoor Water Lines, Faucets and Hoses
Make sure to shut off and drain any external faucets or sprinkler systems. You should also disconnect and store your garden hoses. Failure to turn off water to the exterior faucets can cause your pipes to burst just inside the wall cavity, causing thousands of dollars in damage.
Check for Gaps
As you inspect the exterior of your home, look for gaps between the siding and window frames and doors. Thoroughly fill any noticeable gaps with caulk. It’s an inexpensive way to fix air leaks and it will help save you money on energy bills, not to mention keep unwanted pests from living rent-free in your home over the winter.
Clean the Gutters
Remove leaves and other debris from your gutters to help promote good water movement away from your home throughout the fall, winter and spring. The majority of flooded basements in our area could be fixed or greatly improved by operational gutters around the home.
Inspect Your Roof
While you’re checking on your gutters, make sure your roof can handle the abuse winter doles out. We don’t recommend homeowners climb their own roof due to the inherent risk but even a novice can make solid observations from the top of the ladder. Are the shingles cracked or blistered? Are there any holes through the roofing material? Finding and fixing these deficiencies before winter can save a lot of hassle (and money).
Inspect Chimney and Flue
Check to make sure the chimney is clear of any nests from birds, squirrels or other small animals. Check the damper. Make sure it opens and closes fully, and that it is can be locked in the open or closed position. Check the chimney draft. Make sure the chimney will draw up the fire and smoke properly. Have the chimney cleaned. If it has been several years (or never) since you had your fireplace chimney cleaned, have it done by a professional chimney sweep. This is not a pleasant DIY project, and professional cleaning is not very expensive.
Winterize the Air Conditioning Unit
Cover the condensing unit: Left unprotected, the condensing unit can be damaged by wet leaves and debris that contribute to rusting and freezing of internal components. Although these units are designed for outdoor use, covering them with a breathable waterproof cover made for that purpose goes a long way to extending the life and efficient performance of the unit.
Mind Your Foundation Inspect the perimeter of the foundation and seal any openings with foam sealant. Install covers over crawlspace ventilation openings. Cover basement windows with plastic shields. Rake leaves and debris away from the foundation. Tuck-point or seal foundation cracks and other openings to keep out mice and other pests.These maintenance tips may help ensure your home’s exterior stays safe and sound during the winter months.
Posted in Uncategorized
Hail Damage in Burnsville, Savage, Prior Lake
July 18th, 2019
by Aaron Fruit
In the Early morning hours of Thursday July 18th, a Hail Storm quickly swept through the souther metro causing Damage to cars, homes and businesses. Several of the Local Twin Cities News Outlets were quick to report on the Hail Damage:
Kuhl’s Contracting sent out notification to all of our clients on Burnsville, Savage and Prior Lake to be on the look out for hail damage to their roofs. We have a 2-Part Guide on How to Spot Hail Damage on Your Roof:
It’s also good to acknowledge that when there’s a weather event that causes damages to homes, your will often have Storm Chasing Contractors who like to take your money, do a (often a crappy) quick Job and get out of town. We have a Case Study on Storm Chasers that Can be helpful to know after Home Damage from Hail Storms:
Let Us Know if You Suspect You Have Hail Damage on Your Roof
Here at Kuhl’s Contract ting, we’ve dealt with storm damage for 30 years. We have in house experts that specialize in dealing with Insurance and advocate for our clients. Click to learn more about our Hail Damage Repair Services:
After being brutalized by this winter, many of our clients are considering a permanent move to a warmer place to avoid the headaches associated with ice dams in the future. It’s true that Florida has certain advantages, but we may have a cheaper solution. Heat cables and Heat Tape.
In combination with our sister company (or is it brother?) The Ice Dam Company, we install a ton of heat cables (often called heat tape, heat coils or heat trace) here in Minnesota. Not many people actually understand how to properly design, source and install ice dam prevention cables and as a result we are often called in to tear out and reinstall existing heat cable jobs. We install pre-terminated plug-in heat cables that are simply plugged into existing outlets and we install custom heat cable systems for both 120 and 240 volt applications. Each system has it’s advantages and our sales people can give you the proper guidance as to which is better for your home or business.
When adjustments to the insulation, ventilation or architecture are not feasible, a high-quality heat cable is the best answer. “High quality” is the key aspect to keep in mind because most of the heat cable installed in Minnesota is just the opposite. Homeowners, handymen and contractors alike fall into the same trap. They buy ice dam prevention cables from Home Depot, Lowes, Menards or their local hardware store, thinking they’ve found the answer to their ice dam woes. In fact, what they have purchased is most likely a disposable product called ‘Constant Wattage Heat Cable’. The differences between self-regulating cable and constant wattage cable are too vast to list here but know this, if you are looking for many years of reliable ice dam prevention you should buy a high quality cable. After all, you’re paying for the labor to have a system installed either way. Constant wattage cables like Easy Heat, Frost King and Heatit offer temporary relief at best, and at worse can actually start on fire if you don’t monitor the leaves and other combustibles around the cable system. We use Heat Tape Pro, by Radiant Solutions Company. Our strategic partnership with that manufacturer means we get great pricing on the best self-regulating heat cable on the market.
We install heat cable systems on flat roofs, metal roofs, wood roofs, slate roofs, rubber roofs and more. Each system require it’s own set of specialized heat cable accessories and the right technical skill to install it. Kuhl’s Contracting knows this topic inside and out. Click here to get a free estimate for your ice dam prevention heat cable system.
Posted in Uncategorized
Ice Damage to Copper Gutters
March 13th, 2019
by Aaron Fruit
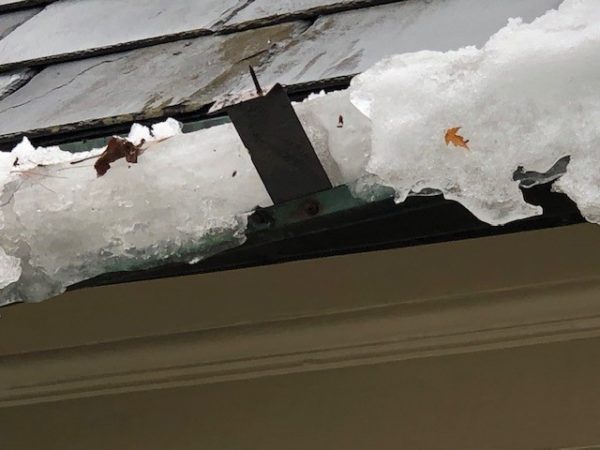
Many of you are aware that we operate a division of our company that specializes in ice dam removal and prevention in the greater metro area of Minneapolis and St. Paul called The Ice Dam Company. We are the oldest and most likely largest ice dam removal and prevention business in the United States and the only such company directly linked to a large exteriors and remodeling company. Good stuff. What we have seen this season in the Twin Cities was pretty remarkable, even by Minnesota ice dam standards. It’s safe to say that this year has ranked in the top 3 worst ice dam seasons in the past 25 years, with thousands of homes being badly damaged as the result of water intrusion relating to ice dams. The Ice Dam Company has been working seven days a week to stay on top of demand and we haven’t even come close to addressing all of the calls and emails we received. That brings us to the topic at hand: Copper gutters and ice damage.
We are currently receiving an unusual number of calls from clients whose gutters have been damaged by ice and snow. This is a phenomena that affects homes with steeper roofs mostly, in particular with cedar and slate roofing systems because they tend to be quite slippery. The less frictional resistance that the roofing material offers, the more likely ice and snow will slide off, taking the gutters along for the ride. Fixing issues relating to ice and snow damage to gutters is relatively simple. Simple but not always cheap. Copper gutters a the most expensive systems used and when those gutters are integrated into roofing systems like slate or tile the replacement of said systems can get very, very expensive, often involving the removal and replacement of the lower 2-3 feet of roof adjacent to all affected areas.
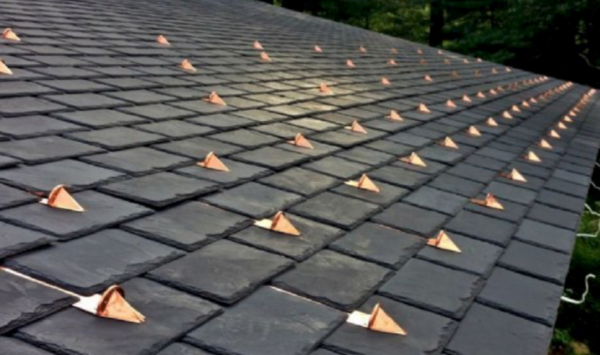
The next obvious topic relates to preventive this sort of damage in the future. The only real solution is to install a series of snow guards to reduce the velocity of the snow and ice that may hit the gutter system. Such guards usually cost $15-$25 per piece before installation, with factors such as roof pitch, job height, access and roofing system playing a significant roll in the final project cost. It’s not unusual to spend $30-$40 per piece for labor and materials to install snow guards.
Posted in Uncategorized
Cost for a new Shingle Roof
April 5th, 2018
by Aaron Fruit
How Much Does it Cost for a New Roof?
The cost for a new asphalt roof in Minneapolis ranges from roughly $325 to $600 per square. A square is a roofing term for an area equal to 100 square feet. Most roofs in the Twin Cities fall into the range of 20 to 100 square. I know, doing the math on the two figures presented so far means that your new asphalt roof costs somewhere between $7,100 and $60,000. Not super helpful data so far. Let’s dig deeper to uncover the actual factors that determine how to determine the cost for a new shingle roof.
Calculating the Cost of an Asphalt Roof
New Roof Cost Factor #1: Roof Size
There are a number of variables that affect the cost for a new shingle roof. First, and most obvious is the size. The larger the roof, the greater the cost. Greater roof area translates directly into more materials, more labor, higher permitting and hauling fees.
New Roof Cost Factor #2:
Shingle Material
Unlike cedar roofing, the price for a new asphalt shingle roof can vary widely depending on the material choice. In other words, there is a wide range of cost, color, style and performance possibilities in the asphalt shingle world. One could go to Home Depot and purchase a super cheap, basic three-tab asphalt (think of your grandmas roof) or one couple buy a super high-end designer asphalt shingle from a specialty supplier, or anything in-between. The asphalt shingle cost alone can range from $68 per square to well over $280 per square. Most of the asphalt shingles Kuhl installs on Minnesota homes falls into the ‘designer’ asphalt category because people usually see the value over the long run.
New Roof Cost Factor #3: Roof Complexity
There are a dozen roof styles out there, from mansard to gambrel, from hip to gable, to shed and mono-pitch. In Minneapolis, most asphalt roofs are either a hip or gable style. Knowing the difference isn’t important for this discussion but suffice it to say that some roofs are more complex than others. They have more facets, valleys, dormers, architectural features and intersecting roof planes. The greater the roof complexity, the higher the roof replacement cost. Giant, uninterrupted roof planes are much easier to complete that multiple, intersecting roof planes.
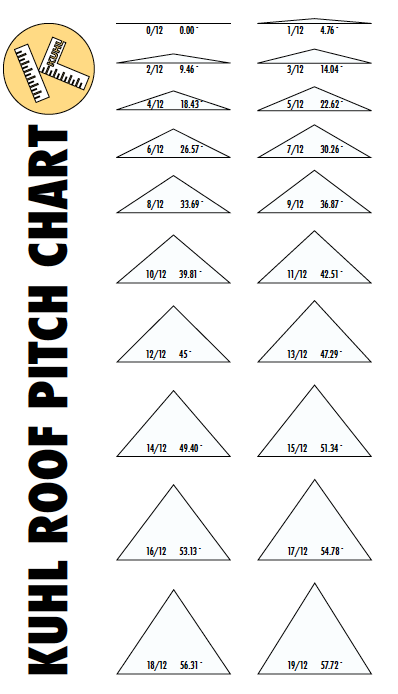
New Roof Cost Factor #4: Roof Pitch (or ‘Slope’)
cost for a new shingle roof is pitch. In the roofing business we define pitch according to units rise to units of run. A 3/12 roof pitch implies that for every twelve inches of horizontal travel there is three inches of vertical rise. Therefore, a 3/12 roof is much flatter than a 12/12. The primary cost difference between flat and steep slopes in asphalt shingle roofing relates to labor. The material cost does not change drastically with changes in slope but labor costs increase quite a bit. Steeper roof pitches require that every move is made under roof and harness, which greatly slows down the process of reshingling a roof with asphalt shingles.
How to Save Money on the Cost for a new Shingle Roof
As with any contracting performed on your home, you can make cuts out of labor or materials. But as with anything you buy in the free market, you generally get what you pay for. Hiring cheap contractors seldom results in something good. Likewise, given that the labor is almost the same for installing cheap asphalt shingles as it is expensive asphalt shingles, we always recommend spending a little extra on quality. Once and a while our suppliers run specials on certain types of asphalt shingle roofing. When this happens we let clients in the estimation phase know about the opportunity. This can result in saving 5-10% off the material cost in some cases.
Let Us Know if We can Help Determine the cost of Your Roof Project
If your considering replacing your roof and are looking to find the cost for a new shingle roof to plan your project budget, the best way is to talk to a project manager who can help you find the appropriate plan for a roof cost that is best for you. Contact us today if you’d like to discuss.
Posted in Uncategorized
How To Identify Good Cedar Roofing
October 13th, 2017
by Aaron Fruit
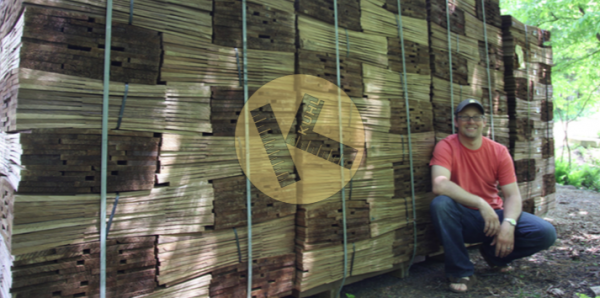
Tips on grading the cedar roofing material that shows up at your home for your roofing job.
Introduction, by Steve Kuhl
There are many variables that factor into the quality and character of cedar shake and shingle roofing including the age of the tree when logged, the region the tree came from, the thickness of the material, its’natural oil and resin content and the percentage of clear heartwood in each piece. Perhaps nothing has a more immediate impact on longevity than grain orientation, however. Put simply, the more edge grain (aka ‘vertical grain’) the better. One of the favorite tricks roofers use to reduce the cost of their estimates is to source their material through lower quality mills. The point is, regardless of the color of the Label, vertical grain content is an easy identifier that anyone can use to determine the relative quality of cedar shake and shingle roofing and siding.
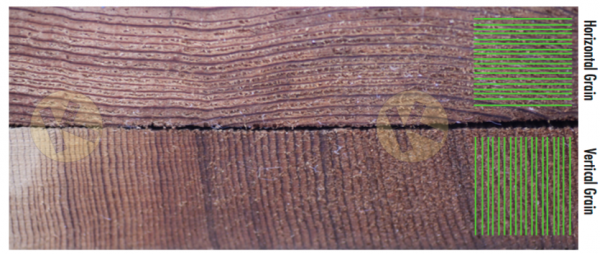
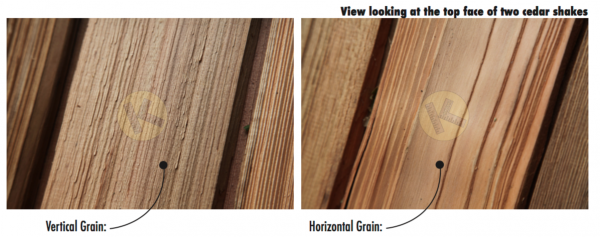
Telling the Difference Between Vertical and Horizontal Grain
View looking at the butt end of two cedar shakes
Vertical Grain vs. Horizontal Grain
Vertical grain is also called ‘edge grain’, ‘vertical sawn’ and often carries the designation of Premium on the manufacturers label. To be characterized as Premium, each bundle of cedar shakes must contain 100% vertical grain shakes. Horizontal grain is also called ‘flat sawn’ and ‘edge grain’. 95% of the roofs applied in Minnesota are certified as #1 Grade, Blue Label material, which are certified to contain no more than 20% horizontal grain. In short, Premiums are 100% vertical grain and #1 Grade are at least 80% vertical grain. The more vertical grain the better. If you can afford 100% vertical grain it is a good investment.
SaveSave
SaveSave
Posted in Uncategorized
Flat Roof Leak Repair
September 22nd, 2017
by Aaron Fruit
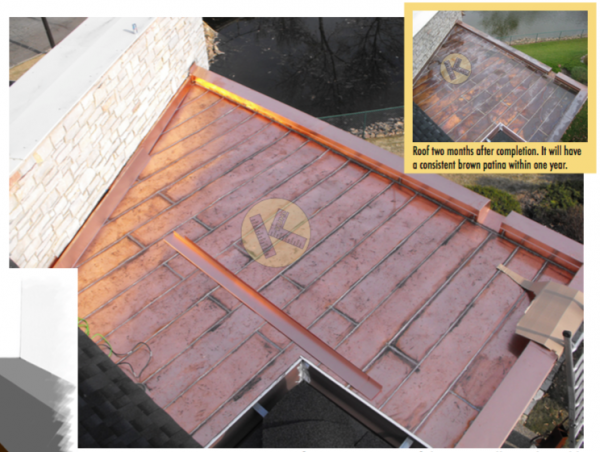
Flat Roof In Minneapolis Leaked for Years and Copper Was the Answer
The Problem:
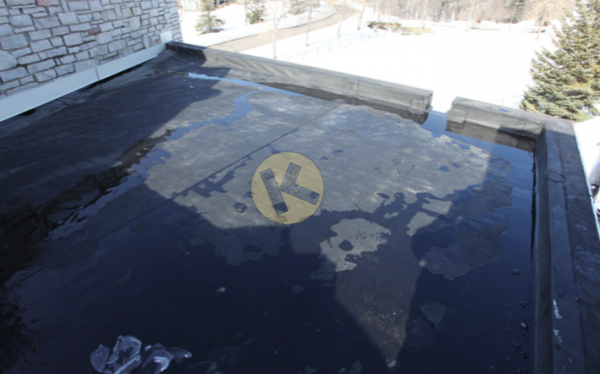
Perhaps you have heard it before. There are two types of at roofs: Those that are leaking and those that are about to leak. In fairness to flat roofs, the reality is that there is no truly permanent roof. When at roofs fail they usually have more dramatic and immediate problems (rot, mold, collapsed ceilings, etc.). The project featured in this Case Study was no exception.
The demands placed on flat roofs in Minneapolis create a unique set of challenges to even the most robust systems. The flat roof here was a 10 year old rubber membrane roof (aka, EPDM). Over the past few years as the leaks got worse and worse our client had a few contractors attempt to x the problem. By the time we arrived it was clearly a case where total replacement was warranted.
The Solution:
As with most residential construction challenges, proper diagnosis of the problem is the best place to start. We used our thermal imager after a long rain storm to look into the ceiling. The resulting images indicated three separate leaks, confirming the idea that roof replacement was smarter than repair.
We gave our client two material options including TPO membrane and copper. They choose copper because this roof was visible from the master suite and they wanted a touch of architectural character. Years later the roof is still leak free.
New at seam copper roof during installation by Kuhl.
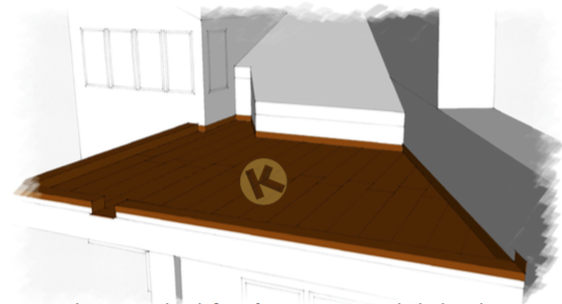
Project rendering. We are the only at roof contractor in Minneapolis that has in-house project design talent. Our clients have come to appreciate our ability to show them exactly what they are buying before the project begins. Projects like this should only be done once.
Posted in Uncategorized
Minneapolis Cedar Roof Comparisons
September 8th, 2017
by Aaron Fruit
Here is a basic description of the most common cedar roofs installed in Minnesota. We offer much deeper info on each in other Kuhl Case Studies.
Four Most Common Cedar Roofs Installed in Minneapolis.
16” Machine Sawn Shingles (Lifespan 17-21 Years)
Cedar shingles are used for both roof and side wall applications and offer a lighter, more refined appearance than hand-split shakes. Certain architectural home styles are more appropriate for Sawn Shingles which is the primary reason they are chosen in our experience. On average, this material ranges from 1/4” to 3/8” thick at the butt end and is installed with 5” courses. Expect to get between 17 and 21 years of service out of an unmaintained Cedar Shingle roof in Minnesota. Approximately 13% of Twin Cities cedar roofs are done in Machine Sawn Shingles.
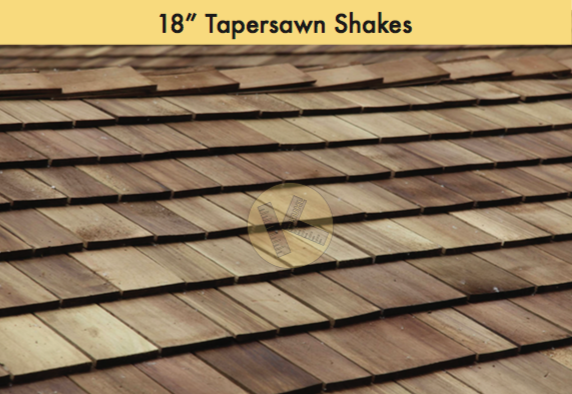
18” Tapersawn Shakes (Lifespan 19-24 Years)
The least common material we see in the Twin Cities, the Tapersawn Shake is essentially a hybrid between a common 24” shake and a 16” shingle. We frequently urge clients to consider using Tapersawn Shakes instead of 16” shingles because they offer the same clean, architectural appearance but are substantially thicker. Remember, when it comes to cedar roofing, thicker is better (all else held equal of course). On average, this material ranges from 5/8” to 3/4” thick at the butt end and is installed with 7”courses. Expect to get between 19 and 24 years of service out of an unmaintained Tapersawn Shake roof in Minnesota. Approximately 1% of Twin Cities cedar roofs are done in Tapersawn Shakes, but that percentage increases each year as more people become familiar with it.
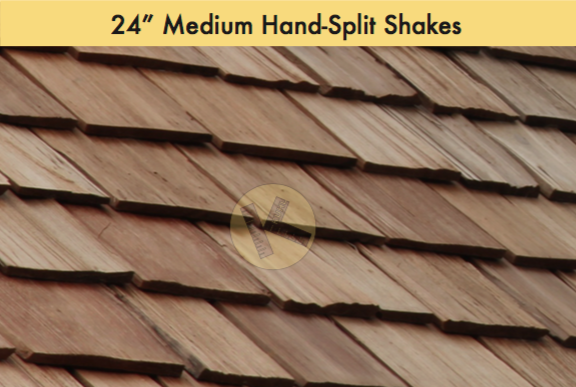
24” Medium Hand-Split Shakes (Lifespan 19-24 Years)
The most common cedar roofing material used in Minnesota, Medium Shakes are the workhorse of the industry. They are the go to choice for home builders primarily because it is the most affordable wood roof. The wide variations in quality from one load of Medium Shakes to the next also allows roofers to cut costs significantly, thus creating the perception of more value and increasing the likelihood Mediums will be selected (over tapersawn or hand-split heavy shakes, for example). On average, this material ranges from 1/2” to 5/8” thick at the butt end and is installed with 10”courses. Expect to get between 19 and 24 years of service out of an unmaintained Medium Shake roof in Minnesota. Approximately 70% of Twin Cities cedar roofs are done in Medium Shakes.
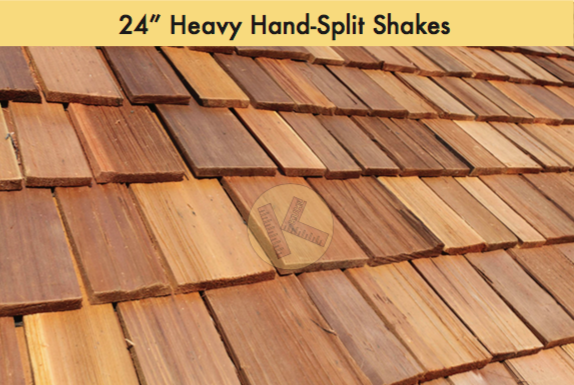
24” Heavy Hand-Split Shakes (Lifespan 25-30 Years)
The second most common cedar roofing material used in Minnesota. We encourage clients to consider Heavy Shakes whenever possible. Because they offer substantially more long-term performance for a small increase in cost up front. From the ground most people cannot tell the difference between Medium and heavy Shakes other than a general increased perception of quality because they have more meat. On average, this material ranges from 3/4” to 7/8” thick at the butt end and is installed with 10”courses. Expect to get between 25 and 30 years of service out of an unmaintained Heavy Cedar Shake roof in Minnesota. Approximately 16% of Twin Cities cedar roofs are done in Heavy Hand-Split Shakes.
Posted in Uncategorized
What Really Kills Most Cedar Shake Roofs
August 18th, 2017
by Aaron Fruit
Forget hail damage, animals, moss, rot, ice and wind. The sun is your roof’s main enemy.
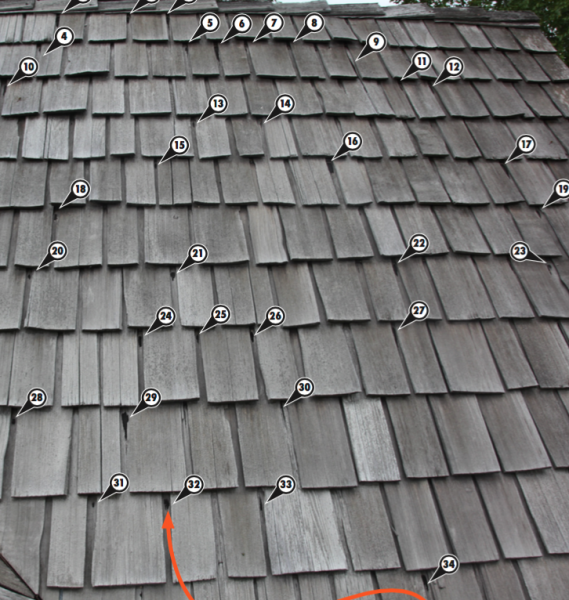
If I’ve said it once, I’ve said it a thousand times, the purpose of all of the wood on your roof IS NOT to keep water out of your home. Its’ purpose is to protect the tar paper below, which is the stuff that actually keeps the water from wrecking your ceiling (and your day). As long as the tar paper on your roof stays intact water will stay where it is supposed to be; outside. The roof shown here appeared fine from the ground. In fact, this homeowner received an estimate from a roof washing ‘expert’ that suggested wood cleaning and wood preservation. Bad idea (and bordering on criminal if you ask me).Still, I guess I can see how a novice might think this roof was worth saving. After all, there was no cupping or curling, no missing shakes, no wind or hail damage, no rot caused by organic deterioration, nothing dramatic whatsoever. Upon closer examination I immediately knew it needed to be replaced. Why? Open keyways.
Good from afar but far from good….
Keyways:
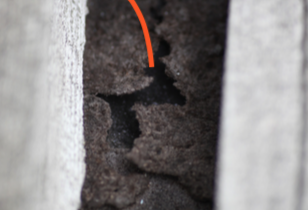
The spaces between the shakes are called ‘Keyways’. In some ways they are the achilles heel of your cedar roof system because the shake in the course below is at its’ thinnest point at the top of the keyway. In the roof shown here there are no less than 34 open keyways in just this small area. The cost to replace that many shakes when factored across the entire roof made the concept of roof repairs unwise. The only option for wood roofs with numerous open keyways is replacement. Open keyways are the number one reason cedar roofs fail. Of the thousands of roofs I’ve inspected this problem accounts for at least 90% of the roof failures with the other 10% comprised of organic rot, fastener failure and installation errors.
Classic UV damaged tar paper. Once the roof decking is exposed below, leaks begin.